10 Executing large analyses on HPC clusters with slurm
This two hour workshop will introduce attendees to the slurm system for using, queuing and scheduling analyses on high performance compute clusters. We will also cover cluster computing concepts and talk about how to estimate the compute resources you need and measure how much you’ve used.
This lesson was originally written by Shannon Joslin for GGG 298 at UC Davis (see original lesson).
10.1 What is a cluster?
A cluster can be thought of as a group of computers which work together to allow you to perform memory intensive functions. Clusters are accessed by logging onto one computer (head node) and resources (other computers) are acquired by asking for resources from job schedulers.
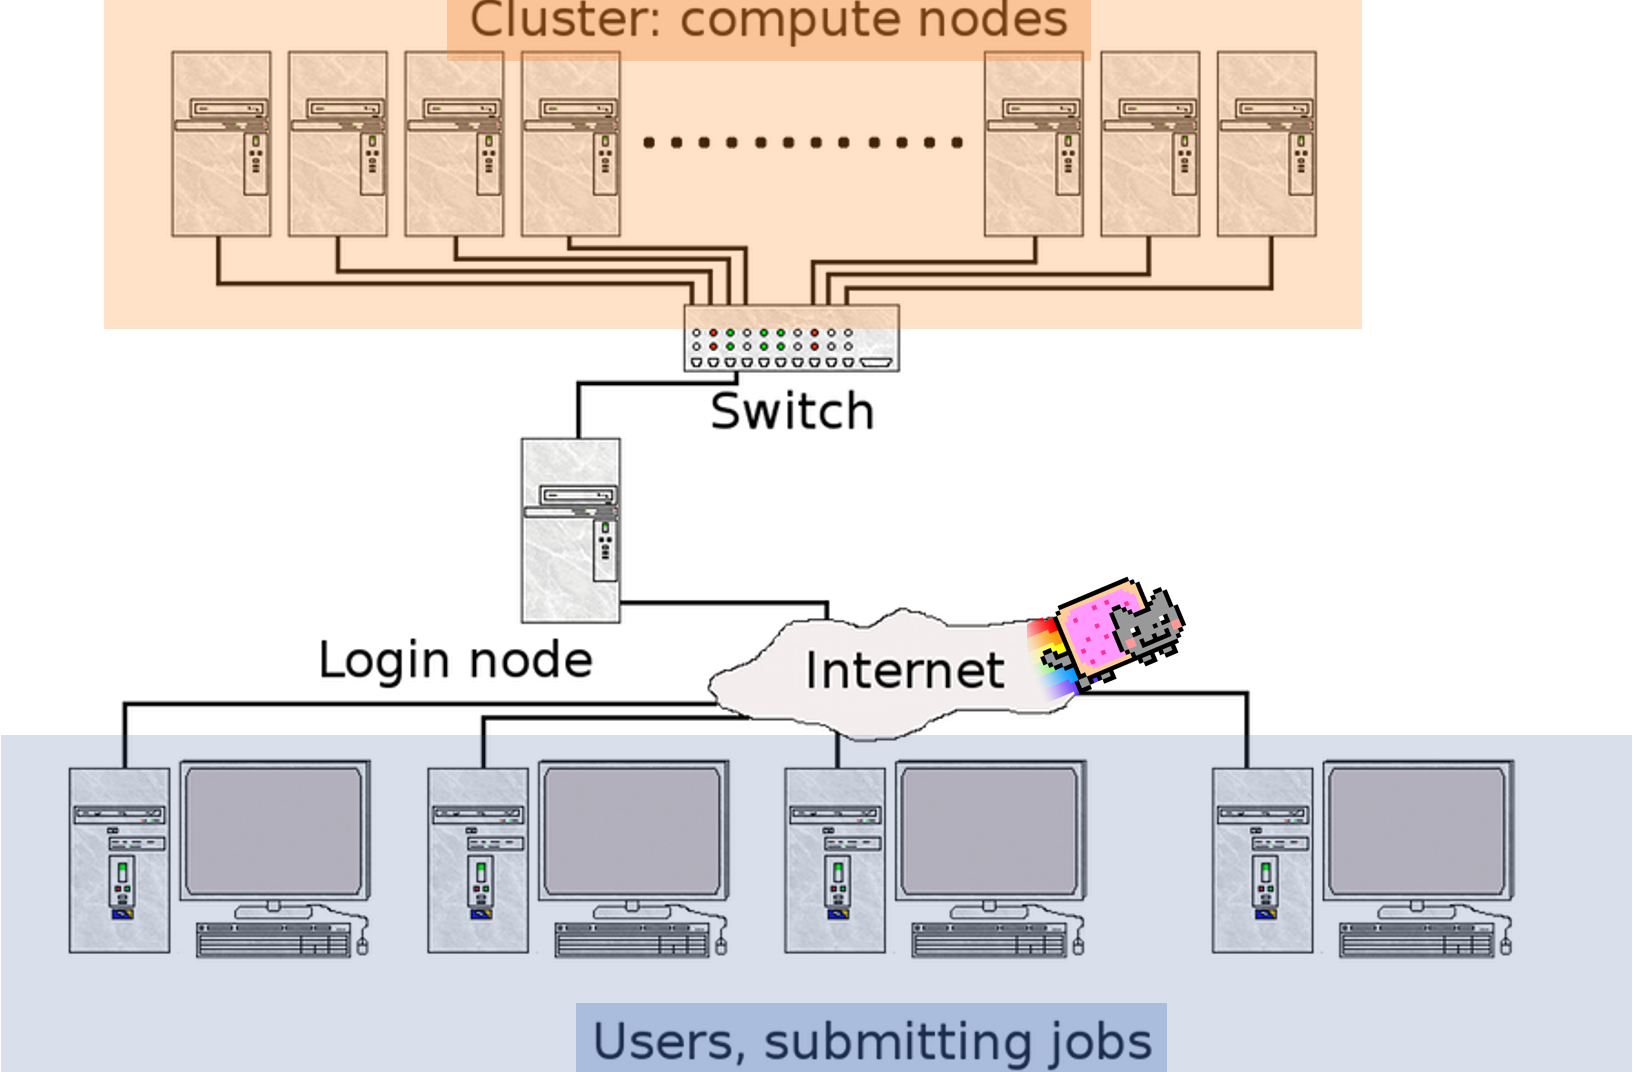
Image modified from vrlab
10.2 How do clusters work?
10.2.1 Job Schedulers
In order to carry out commands that are memory intensive we need to use auxiliary computers that will not affect the login/head node, which is usually shared by many people.
NOTE: sometimes merely copying large files is memory intensive enough that we will need to (or should) use computers other than the head node!
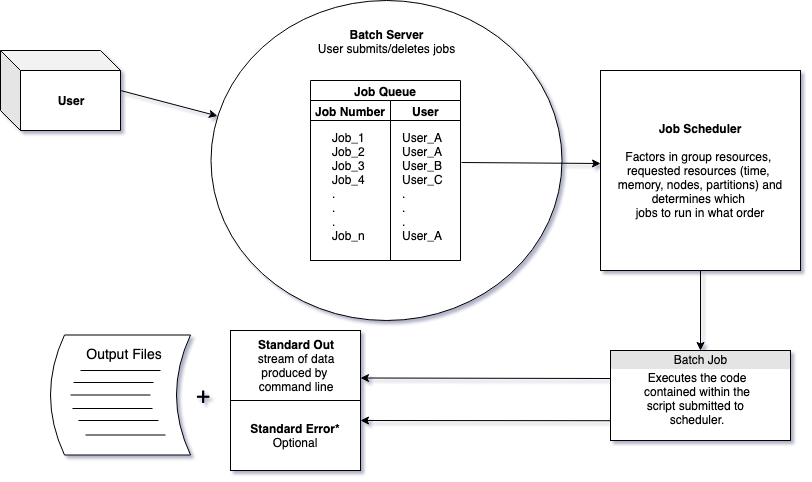
To request resources to run our scripts we use job schedulers. Job schedulers handle how to allocate the compute cluster’s resources to batch job scripts submitted by users.
There are a number of different flavors of job schedulers. The job scheduler you will be submitting jobs to is specific to the cluster you are using at your institution but they all have the following general structure:
The job scheduler evaluates when resources will be dedicated to a job based on the:
- partition & priority (
-p) - how much of the group’s resources are already being used
- requested wall time (
-t) - requested resources
- memory (
--mem) - CPUs (
-c)
- memory (
The Slurm workload manager is an open source workload manager that is commonly used on compute clusters (both farm and barbera at UC Davis use Slurm). It handles allocating resources requested by batch scripts.
There are two main ways you can request resources using Slurm:
10.2.2 EITHER: run an interactive session with srun
Interactive sessions allow you to work on computers that aren’t the login/head node. Essentially you can do everything you’ve done at the command line interface on the compute cluster. This is really powerful for doing memory intensive commands that you may not need to keep track of. However, with this power comes a great danger!
Why is it dangerous? This is an interactive session, so the commands you run will not be saved in scripts anywhere. So, if you wanted to go back and recreate an analysis, you won’t know what you’ve run, how you’ve run it or which versions of software you used.
To request and launch a basic interactive session that will last for 10 minutes, use the following:
srun --partition high2 --time=00:10:00 --pty /bin/bashIf successful, you should see something like:
srun: job 37969118 queued and waiting for resources
srun: job 37969118 has been allocated resources
You’ll also see that your prompt changes.
(base) datalab-09@c6-92:~$
This is because you’re no longer on farm - you’re in a shell on one of
the cluster nodes. (Here, c6-92 is the hostname of one of the
cluster nodes!)
OK, so what’s going on here?
In order to handle jobs, Slurm needs to know where to run it, and the maximum amount of walltime your job will run. This is so that it can properly allocate a computer to handle your job and (try to) predict when those resources will be available for others.
With the --partition flag, you’re telling srun to use a particular
partition, or subset of nodes, that is for high priority jobs -
we’ll talk more about this below!
The --time flag specifies the walltime you’re asking for. Walltime
is literally “the time shown on the clock on the wall”, and can be
measured as the maximum expected amount of time from the start of your
job to the end of the job.
Pay close attention to the time you give to yourself here! Slurm will terminate the session immediately at the end of the allotted time. Sadly, it doesn’t care (or know) if you are 99.99% of the way through your analysis :/
The default resources that you’re allocated are:
- 2 GB of RAM
- 1 CPU
and we’ll show you how to figure that out for yourself, below, using
squeue.
You can request more or different resources by using the following flags:
--mem=<number>Gb= request a certain amount of memory-c <number>= request a certain number of CPUs
Here, the -c flag is the same number you would use for snakemake -j to run many things in parallel; see Automating your analyses with
the snakemake workflow system for the snakemake lesson. (We’ll show
you how to run snakemake inside of slurm below!)
If your prompt doesn’t have farm in it - that is, if you’re logged into
a different computer in an srun session - you should type exit now
to get back to the head node:
exitThis will exit the shell. If you are on farm head node already, this will just log you out of your ssh session and you should log back in ;).
CHALLENGE: on the farm head node, set yourself up for a 5 second session using srun. What happens when the five seconds are up?
10.2.3 OR: Submit batch scripts with sbatch
The alternative to srun is sbatch, which is my preferred way (and
the suggested way!) to run batch job scripts, for several reasons.
Batch job scripts (also known as job scripts) are scripts that contain
#! /bin/bash at the beginning of each script and are submitted to
the slurm workload manager by using sbatch. They are (mostly) just
shell scripts, with a few exceptions. We can use the same commands
that we would use at the command line within our sbatch scripts.
(For more info on bash scripts, see Automating your analyses and executing long-running analyses on remote computers.)
First, to try out sbatch let’s create a script called
HelloWorld.sh.
mkdir -p ~/slurm-lesson
cd ~/slurm-lesson
nano HelloWorld.sh
Then copy and paste the following:
#! /bin/bash

echo Hello World
sleep 15
date
Then exit nano with Ctrl+X
Try running it:
bash HelloWorld.shwhat does it do?
We can submit this script to Slurm with the sbatch command.
sbatch HelloWorld.shbut we receive an error message…
sbatch: error: Batch job submission failed: Invalid account or account/partition combination specifiedAs with srun, above, we must tell Slurm how much time to allow our
submitted script by using the -t/--time flag, and what queue to run
it on with -p/--partition. Let’s tell Slurm that our job shouldn’t
take longer than 5 minutes (note: the format is dd-hh:mm:ss, or
days-hours:minutes:seconds), and to use the high2 partition of the
cluster.
sbatch -t 00-00:05:00 -p high2 HelloWorld.shYou will see your job was successfully submitted and will be given an associated Job ID number:
Submitted batch job 15219016
but with a different number. This is a unique job ID that you can use
to monitor (with squeue) and cancel your job (with scancel).
See Monitoring your jobs with squeue, below.
10.2.4 Flags to use when submitting jobs with sbatch or srun
We can use a number of different flags to specify resources we want from Slurm (we’ll cover how to measure these in Measuring your resource usage).
- the partition we would like to use for our job –
this will also dictate the priority with which our job is run. This is
heavily cluster and account dependent; on farm, your datalab-XX accounts
have access to
high2,med2, andlow2, for example, which let you run on CPU-intensive nodes at high, medium, and low priority. See Partitions, below. - the memory required to run our job. We can request a specified amount of memory with the following flag:
--mem=<number>Gb - we can have slurm e-mail us updates about our job, such as when it starts(
BEGIN), ends(END), if it fails(FAIL) or all of the above (ALL). There are many other mail-type arguments: REQUEUE, ALL, TIME_LIMIT, TIME_LIMIT_90 (reached 90 percent of time limit), TIME_LIMIT_80 (reached 80 percent of time limit), TIME_LIMIT_50 (reached 50 percent of time limit) and ARRAY_TASKS. We can request slurm emails us with the following flags:--mail-user=<your_email> --mail-type=<argument> - we can also give jobs specific names. To name your job use:
-J <job_name>Be careful, as there is a limit to the number of characters your job name can be. - slurm automatically records stdout output where all of the output from commands run from the script are printed to. These will take the form as
slurm-12345.outwhere 12345 is an identifying number (the job ID, by default!) slurm assigns to the file. We can change this to any output file name we want. To specify the name of your output file use-o <file_name>.out - slurm can record stderr output, where all of the errors from the script are printed to. We can ask slurm to create err files and name them with
-e <file_name>.err
If we were being mean to ourselves we would write these out at the
command line each time we submitted a job to slurm with sbatch. It
would look something like this:
sbatch --time=01-02:03:04 -p high2 --mem=4Gb --mail-user=<your_email> --mail-type=ALL -J <job_name> -o <file_name>.out -e <file_name>.err(We would need to switch out all of the <text> with parameters
specific to our preference, but hopefully you get the gist.)
But we can make this much easier on ourselves! Typing all of the parameters out on the command line every time we want to submit a batch script is annoying and it also doesn’t allow us to record what parameters we used easily. We can instead put the parameters to run each job in the script we submit to slurm!
This also has the advantage of supporting repeatability!
10.2.5 Repeatability through SBATCH variables in shell scripts
One of the most important things in computational science is repeatability - can I run exactly the same thing today as I did yesterday? You’d think this would be straightforward, but it is exceptionally easy to run a series of command on data, leave the data for a few months (or years) and come back to the data and have no clue how you went from point A to point Z.
(Just to be clear, this is bad. :)
Let’s say we lost everything except our backed up raw data and we needed to recreate an analysis. In the worst case, where the commands used to carry out the experiment were not saved, we would have to figure out all of the commands with only a vague memory of the steps we took to get results. It is hard, if not impossible to recreate an analysis with exactly the same string of commands and parameters. So, we should think about documenting things as we go.
In the best case (of this terrible scenario) we would have a script to recreate our analysis! So, we can make this easy for our future forgetful-selves and put all of the flags and commands we submit to Slurm INSIDE our batch scripts!
We can do this by adding #SBATCH lines of code after the sha-bang
line (#! /bin/bash) in our script.
Let’s save the parameters we used to run HelloWorld.sh within the
batch script instead of specifying them on the command line.
Modify your HelloWorld.sh script to look like the following:
#! /bin/bash
#
#SBATCH --mail-user=<email>@ucdavis.edu         # YOUR EMAIL ADDRESS
#SBATCH --mail-type=ALL                         # NOTIFICATIONS OF SLURM JOB STATUS - ALL, NONE, BEGIN, END, FAIL, REQUEUE
#SBATCH -J HelloWorld                           # JOB ID
#SBATCH -e HelloWorld.j%j.err                   # STANDARD ERROR FILE TO WRITE TO
#SBATCH -o HelloWorld.j%j.out                   # STANDARD OUTPUT FILE TO WRITE TO
#SBATCH -c 1                                    # NUMBER OF PROCESSORS PER TASK
#SBATCH --mem=1Gb                               # MEMORY POOL TO ALL CORES
#SBATCH --time=00-00:05:00                      # REQUESTED WALL TIME
#SBATCH -p high2                                # PARTITION TO SUBMIT TO

echo Hello World
sleep 15
date(Make sure to replace your <email> with your UC Davis email address.)
Then submit your script:
sbatch HelloWorld.shOnce our scripts start running, we should see the following files in
our current directory: HelloWorld.j#######.err and
HelloWorld.j#######.out. These are the recorded outputs from running
your batch job with slurm!
10.2.6 Reprise: running HelloWorld.sh via srun
Of course, even with all the SBATCH stuff in the script, it’s still just
a shell script that you can run at the command line; the only command that
pays attention to the #SBATCH lines is sbatch itself!
This is useful for debugging. Sometimes you’ll have to debug a script that isn’t working the way you want it to, and you’ll want to do this interactively. If you can use the head node for this, great - but sometimes the problem is that the script uses resources that aren’t available for the head node, OR (even worse) that the script runs fine on the head node, but NOT via sbatch.
In this case, you can use srun to allocate yourself a node, and then
go run the script yourself.
CHALLENGE: Use srun to allocate a node, and then run HelloWorld.sh.
Question: do you get the e-mails and the output files as with sbatch?
(No, because when you’re running the script via bash inside an srun,
slurm doesn’t know it’s a special script.)
10.2.7 Choosing between srun and sbatch
I use srun when I want to explore or debug something, or need an
interactive prompt. Sometimes I’ll use it when I want to run something
at a high priority and don’t want to have to write a batch script, but
I almost always regret it when I do this. (Be better than me!)
I almost always prefer sbatch. There are a bunch of reasons -
- the script is a text file, so I can correct it if I get something wrong!
- the script specifies the resources at the top, so I can edit those easily!
- I can comment the script so I can understand it later.
- I can use version control to track changes to my sbatch scripts (see Keeping Track of Your Files with Version Control)
- I can run one (or a dozen) sbatch scripts at various priorities, and can be notified by e-mail when they’re done. This lets me walk away from the computer :)
10.2.8 A stock sbatch script that includes activating a conda environment
Here’s the sbatch script I usually start with. It has a few nice features:
- it lists the parameters that I usually end up modifying (
-c,-t,--mem) - it supports conda environment activation (see Installing software on remote computers with conda)
- it prints out the resources I actually used at the end! (See Measuring your resource usage below)
#!/bin/bash -login
#SBATCH -p med2                # use 'med2' partition for medium priority
#SBATCH -J myjob               # name for job
#SBATCH -c 1                   # 1 core
#SBATCH -t 1:00:00             # ask for an hour, max
#SBATCH --mem=2000             # memory (2000 mb = 2gb)
#SBATCH --mail-type=ALL
#SBATCH --mail-user=<email>@ucdavis.edu

# initialize conda
. ~/miniconda3/etc/profile.d/conda.sh

# activate your desired conda environment
conda activate base

# fail on weird errors
set -e
set -x

### YOUR COMMANDS GO HERE ###
# for example,
sleep 15
### YOUR COMMANDS GO HERE ###

# Print out values of the current jobs SLURM environment variables
env | grep SLURM

# Print out final statistics about resource use before job exits
scontrol show job ${SLURM_JOB_ID}

sstat --format 'JobID,MaxRSS,AveCPU' -P ${SLURM_JOB_ID}.batch
We’ll talk a bit more about the choices made in this script, below, when we talk about choosing your CPU and memory. See Measuring your resource usage, below.
But first, let’s cover…
10.3 Some useful tips and tricks for happy slurm-ing
10.3.1 Trick 1: running srun inside of a screen.
Back in Automating your analyses and executing long-running analyses on remote computers, we introduced you to Persistent sessions with screen and tmux.
If you are using srun to run commands, it is just like any other interactive shell - if you close your laptop, or your network is disconnected, you’ll terminate the shell.
So I often use screen to make my srun sessions resilient to laptop closure
and shell termination.
There’s one key trick here: run screen first, then run srun.
(I’ll show a demo, you don’t need to follow along - just know that this is a possibility.)
10.3.2 Trick 2: running snakemake inside of an sbatch script.
In our previous workshop, we introduced you to Automating your analyses with the snakemake workflow system. You can use snakemake inside of an srun or sbatch script!
CHALLENGE: Try using srun to run the following commands:
conda activate snakemake
cd ~/snakemake_lesson
rm *.zip *.html
snakemake -j 1
How would you run this with more CPUs? Hint: you need to modify BOTH your srun command AND your snakemake command.
How would you modify the sbatch script in A stock sbatch script that includes activating a conda environment to run this in an sbatch environment?
10.3.3 Monitoring your jobs with squeue
Oftentimes we submit jobs and would like to know certain things about
them – if they’ve started, how long they’ve been running, if they are
still running, etc, etc… We can look at the status of any job
Slurm is handling by using squeue
If we type
squeuethen we see many rows of jobs…
         JOBID PARTITION     NAME     USER ST        TIME  NODES CPU MIN_ME NODELIST(REASON)
      15218450       bmh this_is_ keyu1996 CG       31:10      1 2   100G   bm3
      15219413       bmh     pigz   aminio CG        0:01      1 8   4G     bm2
15108157_[34-4   bigmemm  mapping gfburgue PD        0:00      1 8   200G   (Resources)
14204771_[1182       med freebaye eoziolor PD        0:00      1 4   2000M  (AssocGrpCpuLimit)
15217722_[7-23       bmm     trim hansvgdu PD        0:00      1 2   10G    (JobArrayTaskLimit)
      15113687   bigmemm AA_ophiu jgillung PD        0:00      1 24  200G   (Priority)
      15144078   bigmemm NT_ophiu jgillung PD        0:00      1 24  200G   (Priority)
      15144205   bigmemm AA_plant jgillung PD        0:00      1 24  200G   (Priority)
      15144210   bigmemm NT_plant jgillung PD        0:00      1 24  200G   (Priority)
This is a list of ALL the jobs currently submitted to Slurm – which usually quite a few! And often we won’t be able to scroll through the list to find our job(s). So, in order to only see your own job(s) we can specify a username:
If you don’t know your username, you can find it in a couple of ways:
1. the whoami command:
whoami- with
$USER
echo $USER(Note: there are subtle differences between the two. The whoami
command displays the effective user id at the time the command is
entered. The $USER is an environment variable that is set by the
shell–it won’t work on all operating systems but it works great here!)
We can use the output of this to see the status of the jobs associated with a particular username:
squeue -u $USER JOBID PARTITION NAME USER ST TIME NODES CPU MIN_ME NODELIST(REASON)
15219530 bmh ggg298-a ggg298-4 R 0:28 1 8 10G bm14Much better!!
Not only can you check on your own job’s status but you can also check
on the status of your slurm group; here, our slurm group is ctbrowngrp:
squeue -A ctbrowngrpYou can also check on the status of particular partitions:
squeue -p high2These will show you what resources are being used so you can figure out which are free, sort of.
Note: squeue -u username is how I figured out what my NODES and CPU
specs were for the srun, above.
10.3.4 Canceling your jobs with scancel
To cancel a single job you can specify the JOBID
scancel <job_ID>To cancel all of the jobs that belong to you, use the -uflag.
scancel -u <username>CHALLENGE: Use srun to set yourself up with a 10 minute session on high2; then, in the session, use squeue -u to find the job ID of your session; then, scancel it. Alternatively, you can cancel ALL your jobs with scancel -u.
10.4 More on resources and queues and sharing
10.4.1 Measuring your resource usage
There’s an old joke that you can tell to your kids if you want to teach them to distrust you.
Do you know how they figure out what the weight limits are on bridges?
They build the bridge, and then they run bigger and bigger trucks over it until the bridge fails. Then they record the weight of the last truck that succeeded in crossing the bridge, and use that as the weight limit for the bridge.
It’s funny because it’s not true…
…unless you’re doing big compute, in which case it’s basically exactly that.
For Reasons, there is no one-size-fits-all 100% reliable way to estimate the resources needed. But you can measure the resources used when a job completes successfully!
(For this reason, I suggest that the first time you run a job, you request more resources than you think you’ll need - more time, more memory - and then trim it back after measuring it.)
There are two ways to estimate your resources.
First, you can use /usr/bin/time -v to measure the time and memory needed
to run a command.
You’re looking for the following output:
...
Elapsed (wall clock) time (h:mm:ss or m:ss): 0:00.03
...
Maximum resident set size (kbytes): 2516
...
The first is how much time it took, the second is the max amount of memory (in kb) needed.
You can use this to measure the amount of time it takes to run a script.
CHALLENGE: Use /usr/bin/time -v to run the HelloWorld.sh
script. What resources does it need?
The other way is to add the following command to the bottom of your HelloWorld.sh script:
sstat –format ‘JobID,MaxRSS,AveCPU’ -P ${SLURM_JOB_ID}.batch
which will put the following output in your .out file:
JobID|MaxRSS|AveCPU
37971877.batch|952K|00:00.000
OPTIONAL CHALLENGE: Let’s do this to look at the snakemake workflow!
Steps:
- create the sbatch script to run snakemake - see A stock sbatch script that includes activating a conda environment
- remove .zip and .html
- submit the script with
sbatch - …wait…
- inspect the output file.
10.4.2 Nodes vs CPUs vs tasks
You will at some point see slurm docs making distinctions between nodes, tasks, and CPUs per task.
My advice for people just beginning to work with slurm is to ignore all
of this until you need it, and just use -c or --cpus-per-task, and
leave -N and -n set at 1 (which is the default).
That having been said… here’s what they mean:
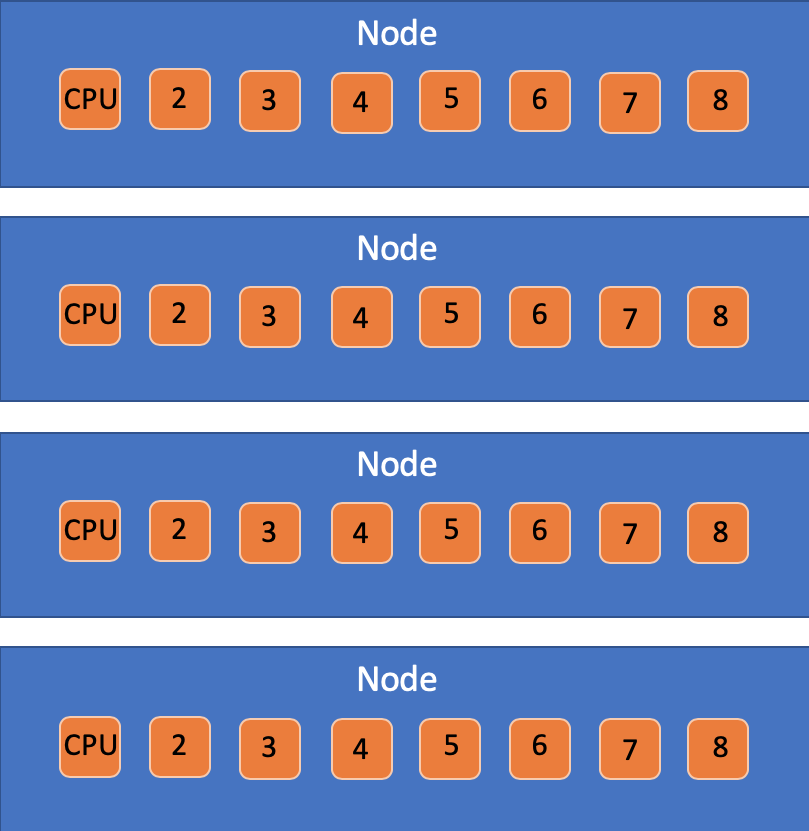
- Node: A physical box that connects memory systems with extension cards and CPU cores.
- CPU Core: An independent computing unit that can access a certain number of CPU threads with all the threads having independent input streams but sharing the core’s total memory.
- tasks: A way to organize tasks that may have multiple CPUs per each task.
The -c flag will adjust the number of CPUs per process. Alter this
if the job is multithreaded and requires more than one CPU per task to
perform optimally. If this option is specified without the -n flag,
then as many tasks will be allocated to per node as possible. The
-n flag will determine the number of tasks to run. The default Slurm
setting is one CPU per task per node but is adjusted when using -c.
10.4.3 Partitions
Partitions are the subsets of the cluster (or “partitions of the whole cluster”) that you have access to. I am not an expert on the details, but basically they specify (1) a set of computers and (2) a priority for running things on
When you get your account on an HPC, you’ll get a listing of what you have partitions you have access to. Here’s what my group gets on farm.
We have access to:
- low2 - low priority compute nodes
- med2 - medium priority compute nodes
- high2 - high priority compute nodes
as well as
- bml - low priority big mem node (up to a TB)
- bmm - medium priority big mem node
- bmh - high priority big mem node
The way priorities work on farm is as follows:
- bmh = get a dedicated computer that you purchased, within 1 minute
- bmm = get more than what you paid for, if there’s any free resources (which is usually), but your job might be suspended if another user asks for nodes on their computer in bmh.
- bml = get (way) more than you paid for (just like bmm) but your job might be killed and rescheduled.
On bmh/bmm/bml, we have one bigmem node, so:
- 1TB of memory max
- 96 CPU
On high2/med2/low2, we have two parallel nodes, so:
- 512 GB RAM total, 256 GB max per job
- 32 cores on one machine, 64 cores on the other machine
These will all be different for your account and your compute node. See “What are HPC clusters’ access models?” at the HPC FAQ for how this works at UC Davis.
10.4.5 How can you get an account on your HPC?
To figure out what you have access to at UC Davis, see the HPC FAQ, “How do I request access to HPC clusters?”
10.5 What we’ve shown you today.
We’ve discussed how a computer cluster differs from a single remote computer: you have far more resources at your fingertips, but you need to deal with the added complexity of slurm (or another scheduler).
We’ve shown you how to reserve a node interactively (with srun) or for a script (with sbatch).
We’ve given you some tips and tricks for using clusters effectively.
We’ve shown you how to track and examine running jobs.
And, finally, we’ve given you a few different ways to measure resource use, along with some suggestions on how to be a good person and share nicely.
You may never need to use a really big compute cluster to run things. But if you do, you’re at least ready to get started :)
10.6 Some final thoughts before departing farm and moving into the cloud.
This is the last time we’ll use farm. <waves goodbye>
For our last and final workshop in this series, Making use of on-demand “cloud” computers from Amazon Web Services, we’ll show you how to rent computers from Amazon. In our view, this is a great fallback when you have a burst computing need, or don’t have access to specific resources that you need (like GPUs).
Importantly, most of the stuff we’ve learned for remote computing will work just fine no matter what system we use. Shell, text editing, ssh, conda, project organization, shell scripting, version control, and snakemake will all work on any modern UNIX system.
…and that’s why we taught them to you :).