11 Making use of on-demand “cloud” computers from Amazon Web Services
This two hour workshop will introduce attendees to AWS computer “instances” that let you rent compute time on large or specialized computers. We’ll create a small general-purpose Linux computer, connect to it, install some software, and explore the computing environment.
This lesson is based on materials originally developed by Abhijna Parigi, Marisa Lim, and Saranya Canchi for the CFDE training site.
Our goal for this workshop is to help you understand how you might make use of cloud computers for your work.
11.1 Workshop structure and plan
- Brief introduction to AWS and the cloud
- Set up an instance and connect to it
- Install and run things on the cloud computer
- View optional configuration settings for AWS instances
11.2 Some background
What is cloud computing?
- Renting and use of IT services over the internet.
- No direct, active management of hardware by the user.
- Avoid or minimize up-front IT infrastructure costs.
- Amazon and Google, among others, rent compute resources over the internet for money.
Why might you want to use a cloud computer?
There are lots of reasons, but basically “you need a kind of compute or network access that you don’t have.”
- More memory or disk space than you have available otherwise
- An operating system you don’t have access to (Windows? Mac?)
- Installation privileges for software
- May not want to/be able to install specific software on your local computer
- Use commercial software without buying it
- Need access to Graphics Processing Units (GPUs)
11.2.1 Costs and payment
Today, everything you do will be paid for by us. In the future, if you create your own AWS account, you’ll have to put your own credit card on it. We’d be happy to answer questions about options for paying for AWS administratively.
Your free login credentials will work for the next 8 hours ;).
11.3 Amazon, terminology, and logging in!
- Amazon web services is one of the most broadly adopted cloud platforms
- It is a hosting provider that gives you a lot of services including cloud storage and cloud compute.
Amazon’s main compute rental service is called Elastic Compute Cloud (or EC2) and that’s what we’ll be showing you today.
Terminology:
- Instance - a computer that is running …somewhere…, i.e. in “the cloud”. The important thing is that someone else is worrying about the hardware etc, so you’re just renting what you need!
- Cloud computer - same as an “instance”.
- Image - the basic computer install from which an instance is constructed. The configuration of your instance at launch is a copy of the Amazon Machine Image (AMI) that you choose.
For more on why EC2 is named the way it is, see Elasticity (cloud computing)
11.3.1 EC2
- Amazon Elastic Compute Cloud (Amazon EC2) is a web service that provides secure, re-sizable compute capacity in the cloud.
- Basically, you rent virtual computers that are configured according to your needs and run applications and analyses on that computer.
- Well suited for analyses that could crash your local computer. E.g. those that generate or use large output files or take too long
- HIPAA compliant/secure computing is available!
11.3.2 Some features of AWS
- Sign up process is relatively easy (you need a credit card and some patience to deal with delays in two-factor authentication)
- Simple billing
- Stable services with only 3-4 major outages that only lasted 2-3 hours and did not affect all customers (region-specific). A large team of employees who are on top of any problems that arise!
- Lots of people use it, so there are a ton of resources
- Spot instances (unused EC2 instances) - you can “bid” for a price based on current demand. It is cheaper, but your instances might be terminated abruptly if demand goes up too high.
11.4 Let’s get started!
We will create a cloud computer - an “instance” - and then log in to it.
11.4.1 “Spinning up” instances
We’re going do go through the following:
- Select a region: geographic area where AWS has data centers
- Pick the AMI (OS)
- Pick an instance (T2 micro free tier!)
- Launch
11.4.1.1 Step 1: log in
Log in at: https://cfde-ctb.signin.aws.amazon.com/console
Use your datalab-XX account (datalab-08) and the password
datalab-cfde.
Put up a hand on Zoom when you’ve successfully logged in with the workshop user credentials.
11.4.1.2 Step 2: Select region
- Select the AWS region of your remote machine that is closest to your current geographic location. It is displayed on the top right corner.
- Click on it and choose a location. In this tutorial, we have selected N.California because that’s where UC Davis is located and so our network connection to it is generally fast.

AWS Dashboard
A note regarding the “AWS Region”: The default region is automatically displayed in the AWS Dashboard. The choice of region has implications for cost, speed, and performance.
11.4.1.3 Step 3: Choose virtual machine
- Click on Services (upper left corner):

AWS Services
- Click on EC2:

EC2
A note regarding “Amazon EC2”: Amazon Elastic Cloud Computing (Amazon EC2) features virtual computing environments called instances. They have varying combinations of CPU, memory, storage, and networking capacity, and give you the flexibility to choose the appropriate mix of resources for your applications.
- Click on Launch Instance:
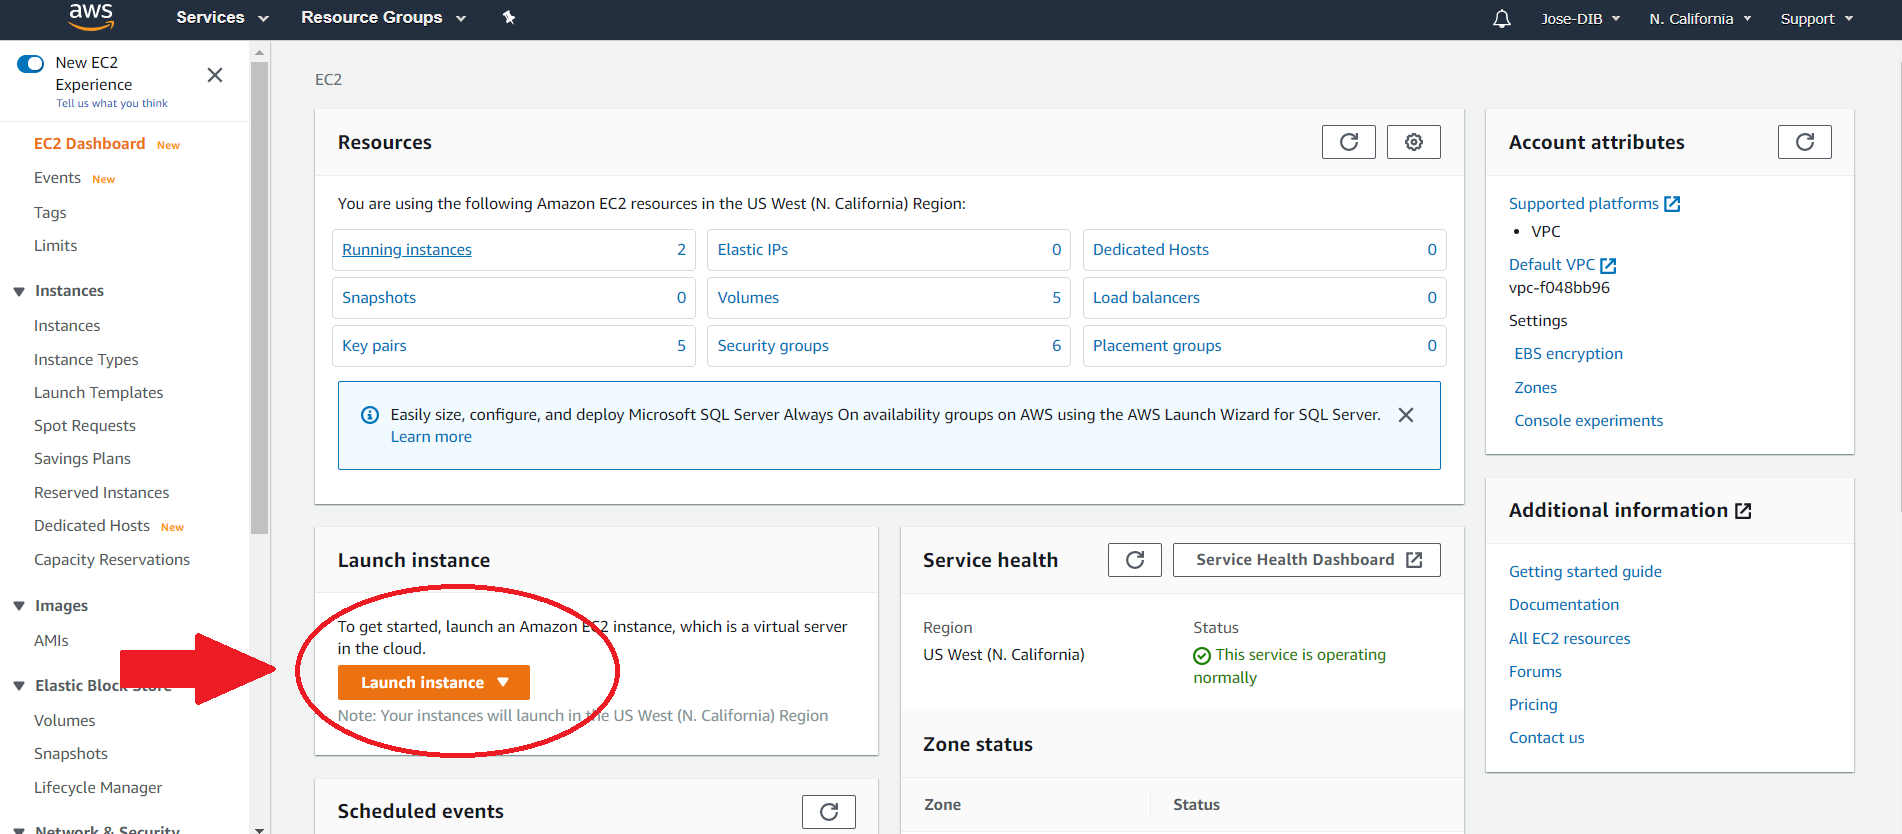
Launch Instance
11.4.1.4 Step 4: Choose an Amazon Machine Image (AMI)
An Amazon Machine Image provides the template for the cloud computer you’re renting - the base installed operating system and applications.
- Select AWS Marketplace on the left hand side tab:
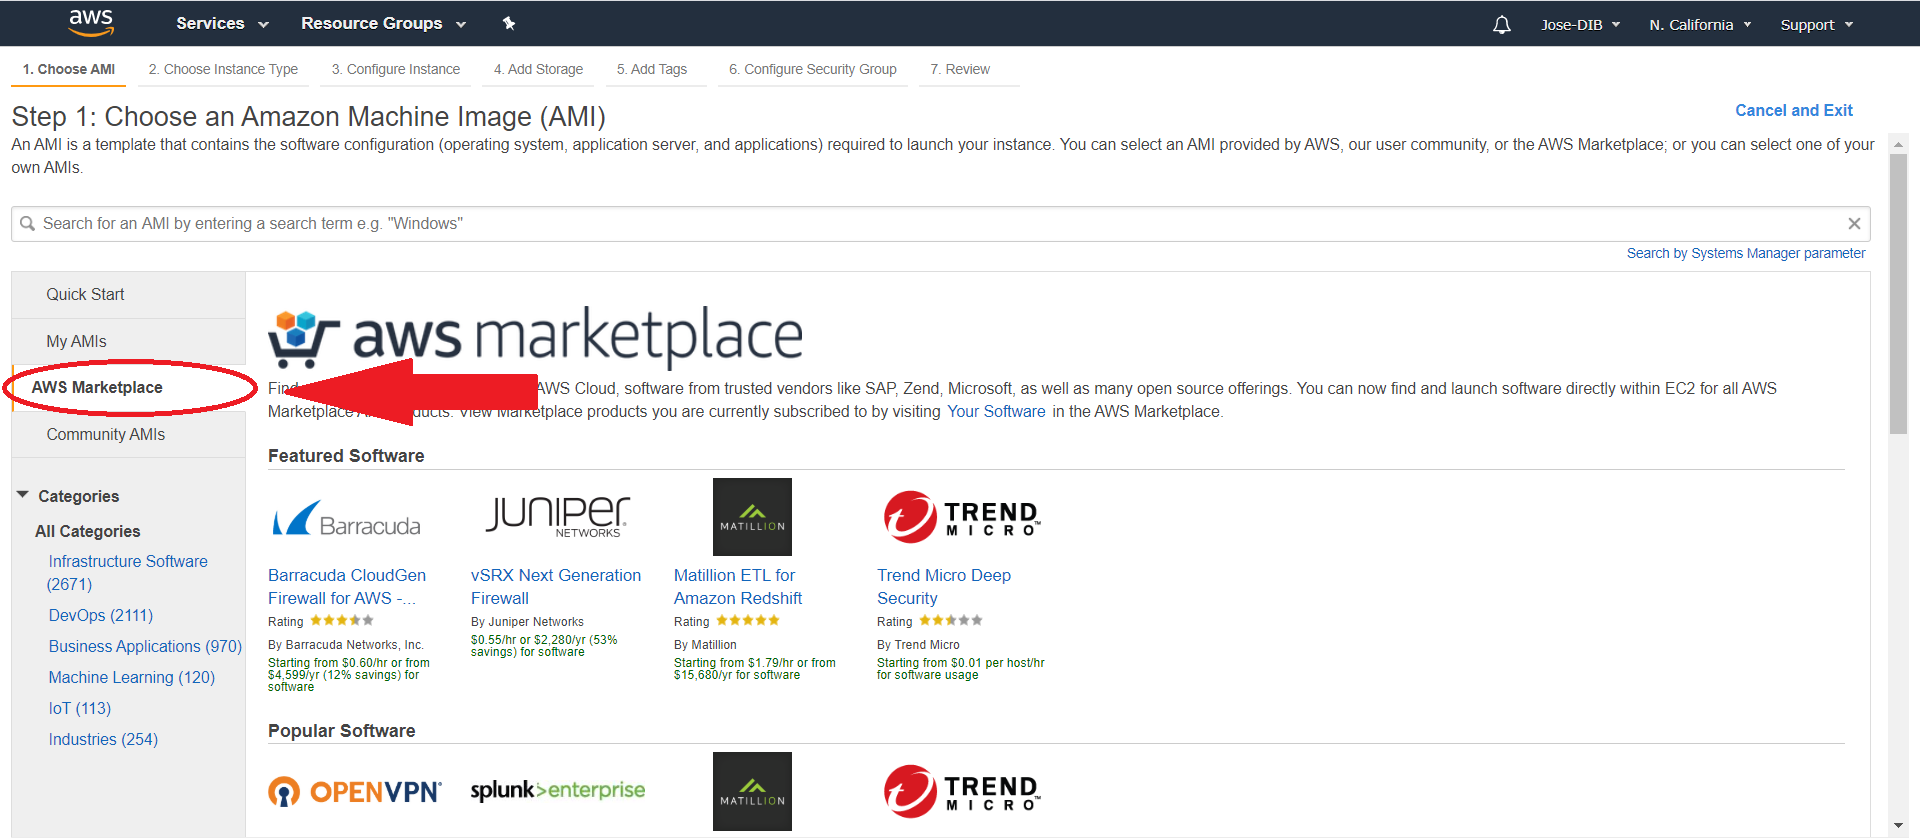
AWS Marketplace
- Type
Ubuntu Proin the search bar. ChooseUbuntu Pro 20.04 LTSby clicking Select:
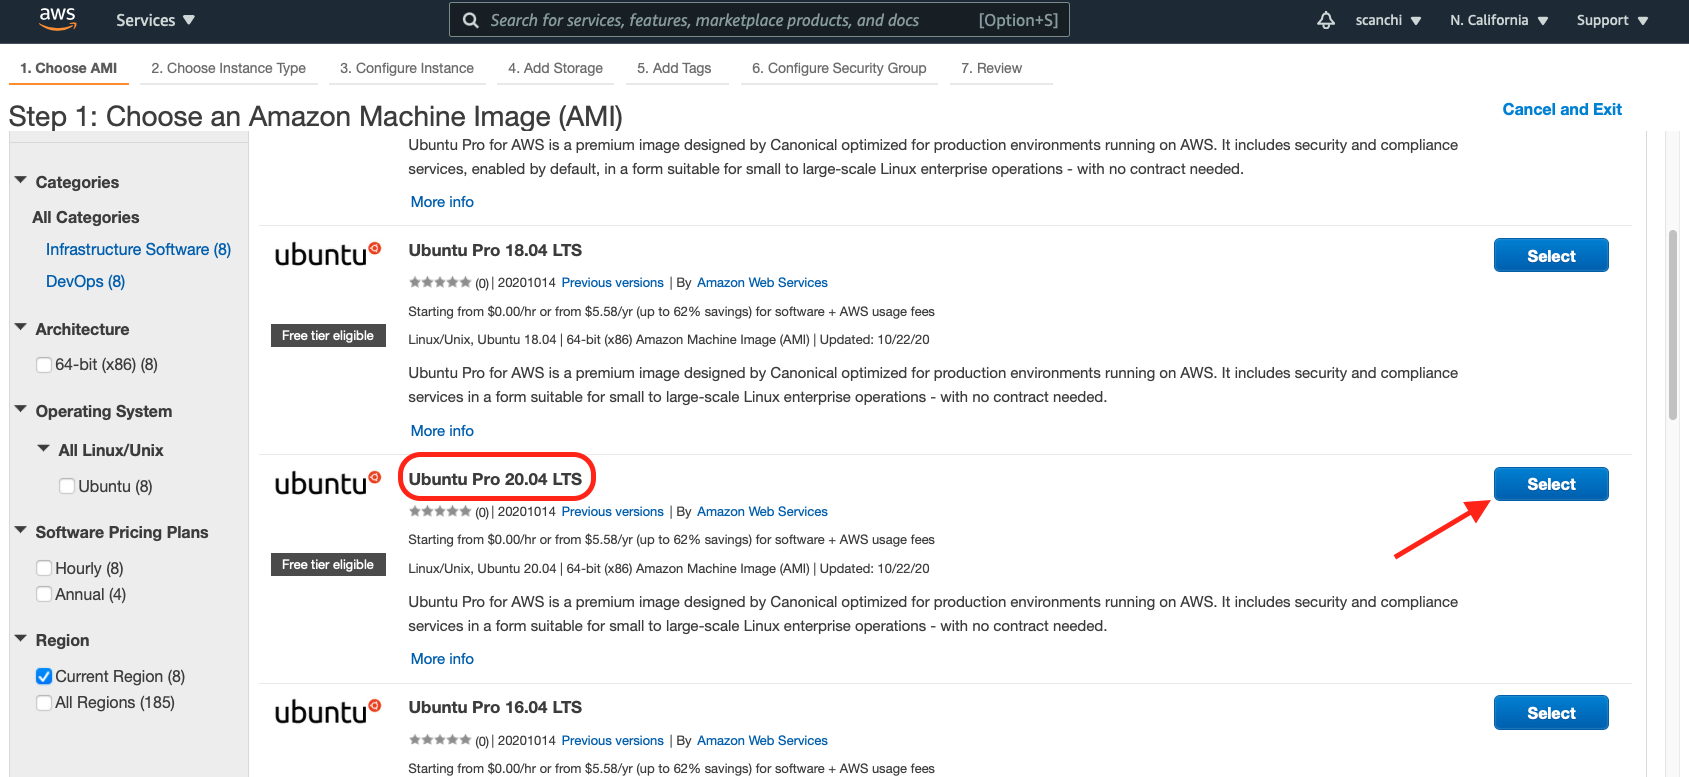
AMI
Why “Ubuntu 20.04 AMI”? Ubuntu 20.04 was released in 2020 and is
the latest version. This is a Long Term Support (LTS) release
which means it will be supported with software updates and security
fixes. Since it is a Pro version the support will last for ten years
until 2030.
- Click Continue on the popup window:
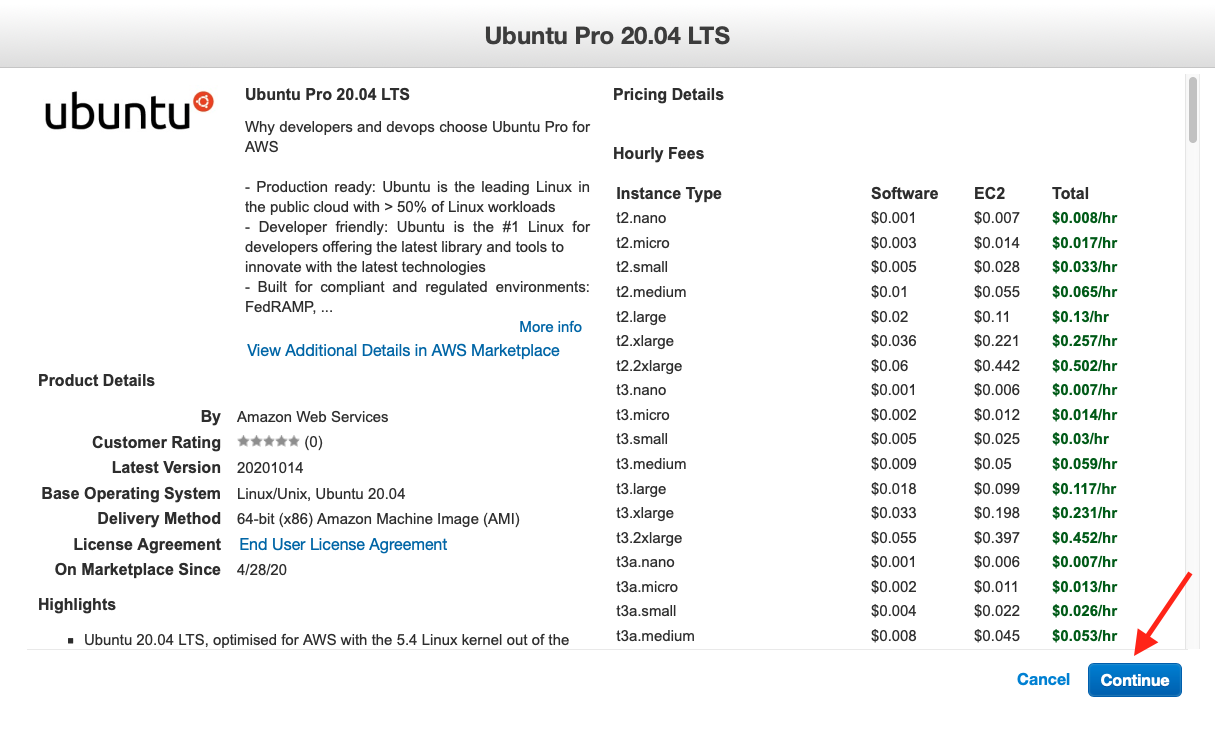
Ubuntu Focal
11.4.1.5 Step 5: Choose an instance type
Amazon EC2 provides a wide selection of instance types optimized to fit different use cases. You can consider instances to be similar to the hardware that will run your OS and applications. Learn more about instance types and how they can meet your computing needs.
- For this tutorial we will select the row with
t2.micro:
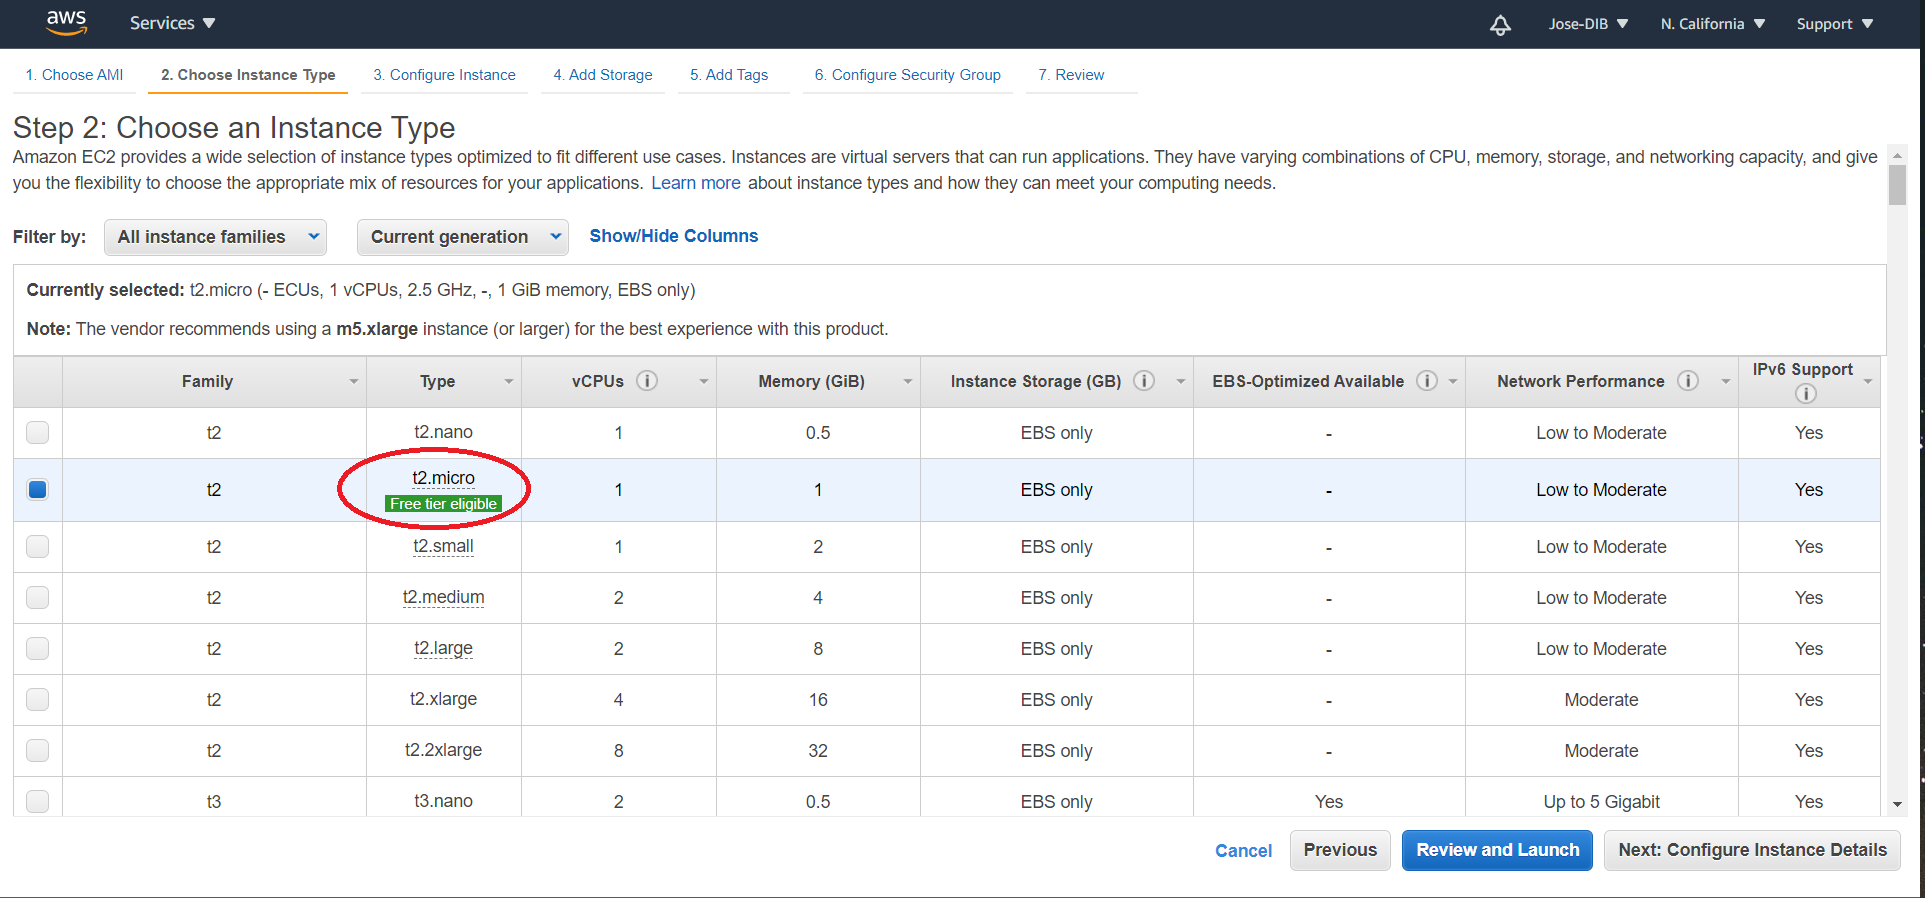
t2.micro
t2.micro is “Free Tier Eligible” - what does that mean? The “Free tier eligible” tag lets us know that this particular operating system is covered by the Free Tier program where you can use (limited) services without being charged. Limits are based on how much storage you allocate and/or how many hours of compute you perform in a one month.
- You can proceed to launch the instance with default configurations by clicking on Review and Launch.
11.4.1.6 Step 6: Review and launch instance
The last tab in setup is Review which summarizes all the selected configurations for the instance.
- Click Launch after review.
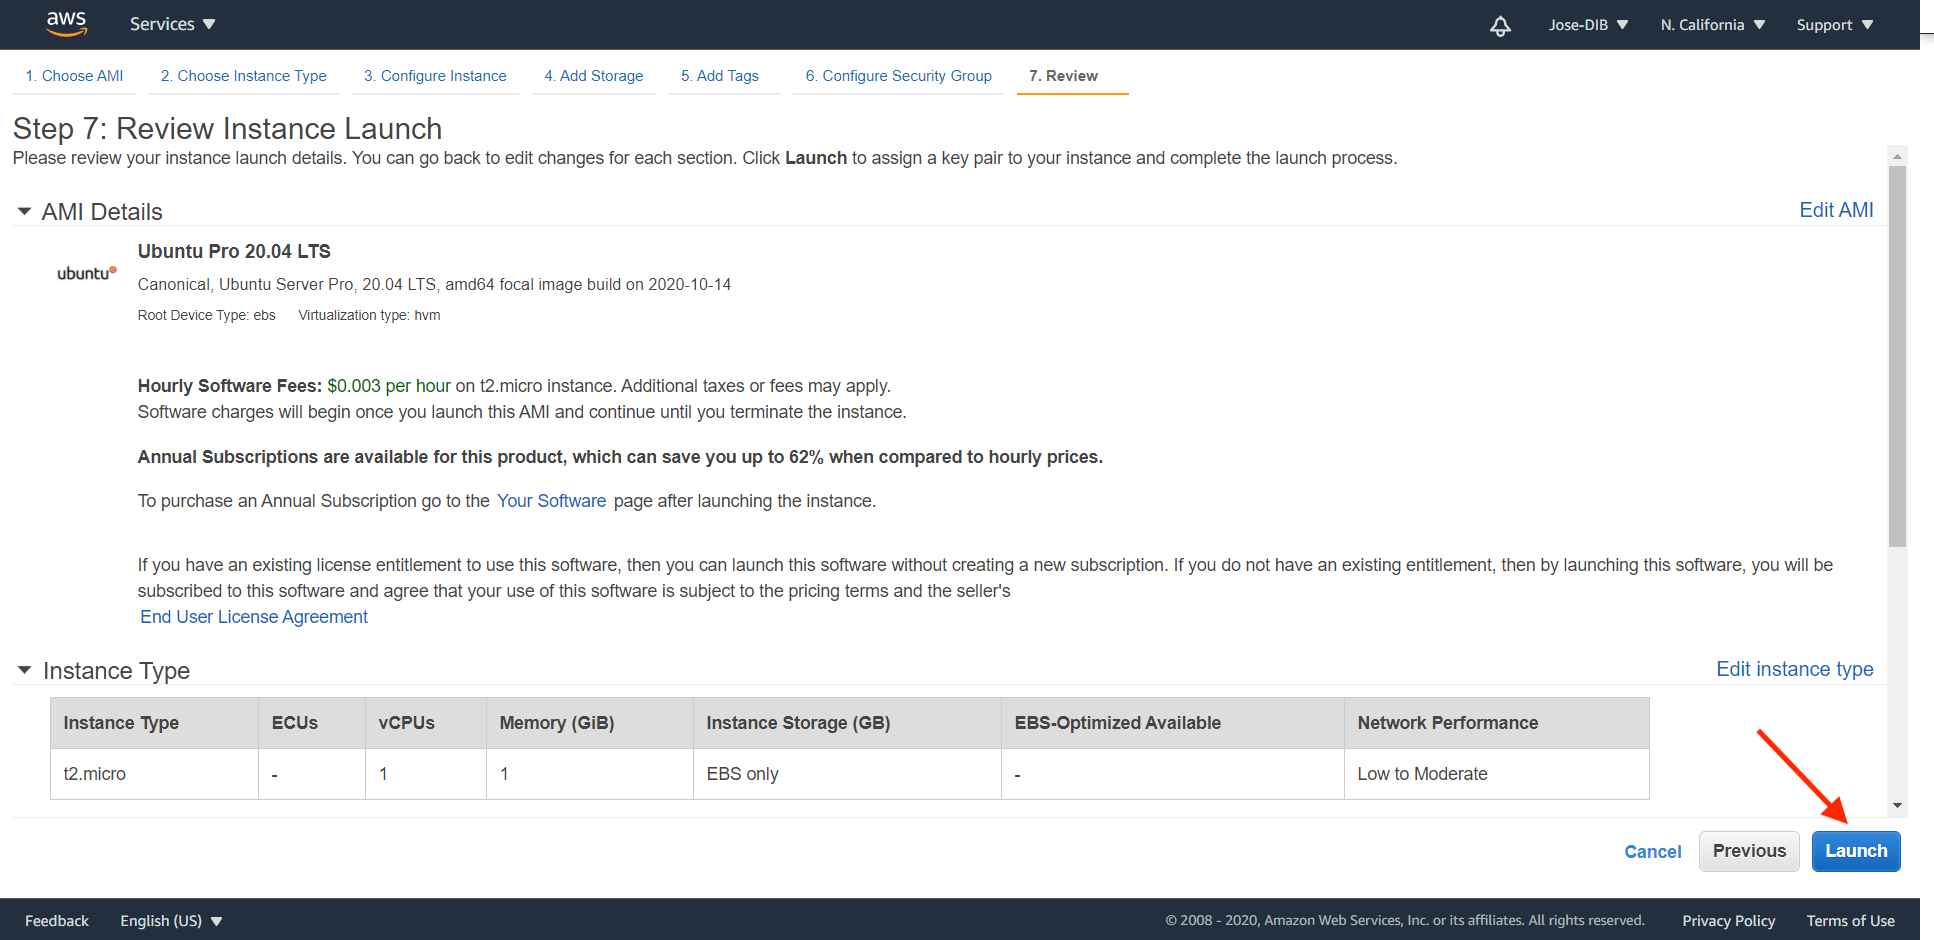
launch instance
11.4.1.7 Step 6a: SSH Key pair
If you are launching an AWS instance for the first time, you will need to generate an ssh key pair. (See Using SSH private/public key pairs from workshop 4!)
- Choose the Create a new key pair option from the drop down menu.
- Type your account name under Key pair name, e.g. “datalab-08”.
- Click Download Key Pair to obtain the
.pemfile to your local machine. You can access the.pemfile from theDownloadsfolder which is typically the default location for saving files. Next time you launch an instance, you can reuse the key pair you just generated, using the Choose an existing key pair option.
**Warning: Do not select Proceed without a key pair option since you will not be able to connect to the instance.*
- Check the acknowledgement box, and click Launch Instances.
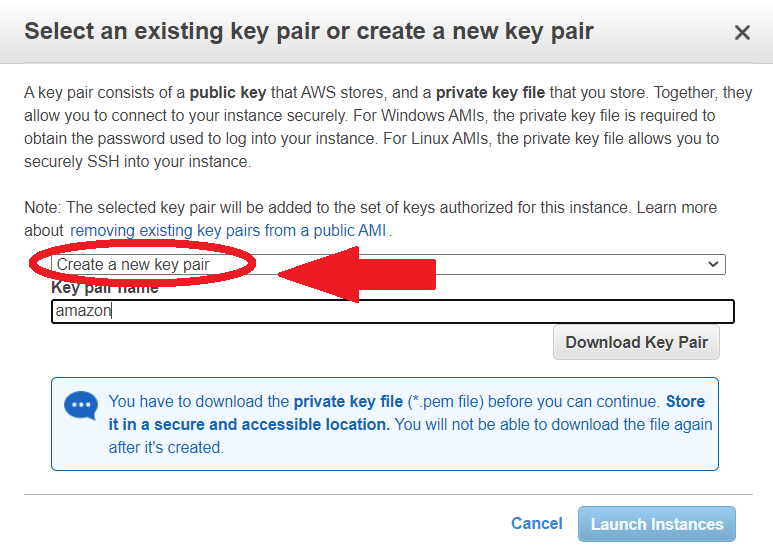
pem key
Why do I need a key pair? With the SSH protocol, public key authentication improves security as it frees users from remembering complicated passwords and allows automated logins as well.
11.4.1.8 Step 6b: Launch status
You will be directed to the Launch Status page where the green colored box on top indicates a successful launch!
- Click on this first hyperlink, which is the instance ID. Your hyperlink will be different!

SSH
11.4.1.9 Step 6c: Get your machine network address
The instance console page shows you a list of all your active instances. If you followed the instructions above, you should have only one.
Here, you should name your machine by clicking on the empty spot under “Name”. Please name it something like “datalab-XX first machine”.
Continue on to the next section to connect to your AWS instance!
11.4.2 Connecting to instance
([The below instructions reprise much of what we did to connect to farm - see Using SSH private/public key pairs)
- Go back to your instance page, select it and click on “Connect”. The Public DNS information you need to connect to your instance via ssh can be found in the “SSH client” tab:

11.4.2.1 MobaXterm on Windows
- In MobaXterm, click on “Session”
- Click on “SSH”
- Enter the Public DNS as the “Remote host” (the part that looks like ec2-[..].us-west-1.compute.amazonaws.com)
- Check box next to “Specify username” and enter “ubuntu” as the username
- Click the “Advanced SSH settings” tab
- Check box by “Use private key”
- Use the document icon to navigate to where you saved the private key (e.g., “amazon.pem”) from AWS on your computer. It is likely on your Desktop or Downloads folder
- Click “OK”
11.4.2.2 MacOS
- Start Terminal
- Change the permissions on the .pem file for security purposes (removes read, write, and execute permissions for all users except the owner (you).
cd ~/Downloads
chmod og-rwx ~/Downloads/datalab-*.pem
Go back to your instance page, select it and click on “Connect”. The information you need to connect to your instance via ssh can be found in the “SSH client” tab:

11.5 Using your computer “in the cloud”
At this point, we can use most of the command we learned in the previous workshops!
11.5.1 Inspecting your computer
See how much disk space you have in your home directory:
cd ~/
df -h .
See how much memory you have access to:
freeLook at your available CPUs:
cat /proc/cpuinfo11.5.2 You can do all the UNIX things
Let’s start by taking a look at some of our friendly old data:
cd ~/
git clone https://github.com/ngs-docs/2021-remote-computing-binder/
and now you run grep, gunzip, cut, and head as usual –
cd ~/2021-remote-computing-binder/SouthParkData/
gunzip All-seasons.csv.gz
head All-seasons.csv
cut -d, -f3 All-seasons.csv | grep Computer | sort | uniq -c
As before, you can’t run csvtk, though, because that’s not a commonly installed UNIX command -
csvtk cut -f Character All-seasons.csv | grep Computer | sort | uniq -cAlso, note that the nano and vi editors are installed by default, but not emacs.
11.5.3 Install conda
Let’s install conda!
Go to the miniconda download page and copy the URL for Python 3.9, Miniconda3 Linux 64-bit.
Then, run:
cd ~/
curl -O https://repo.anaconda.com/miniconda/Miniconda3-py39_4.10.3-Linux-x86_64.sh
Now, following the instructions for Linux install, do:
bash ~/Miniconda3-py39_4.10.3-Linux-x86_64.shand answer “yes” to accept the license, and “yes” to have the installer initialize Miniconda.
Then, reload your .bashrc:
source ~/.bashrcand you should now be at a prompt that includes (base), e.g. (base) ubuntu@ip-172-30-2-92:~$.
We also need to add some channels (see Installing conda) -
conda config --add channels defaults
conda config --add channels bioconda
conda config --add channels conda-forge
and then let’s install mamba, a faster version of the ‘conda’ command.
conda install -y mamba11.5.4 Run a snakemake workflow
Let’s reprise Automating your analyses with the snakemake workflow system.
First, let’s check out a git repository that contains our snakemake workflow:
cd ~/
git clone https://github.com/ngs-docs/2021-remote-computing-snakemake
Then, create a conda environment with the necessary software:
mamba create -n snakemake -y snakemake-minimal fastqc salmon
conda activate snakemake
Change our working directory to the git repo:
cd ~/2021-remote-computing-snakemake/Run a shell script to download the raw data:
./download.sh…and finally, run snakemake!
snakemake -j 1Tada! You’ll have all your output files etc.
(Note that you could perfectly well have run this inside of a screen session - see Persistent sessions with screen and tmux.)
11.5.5 Summing things up, round 1
This highlights many of the things that we’ve taught you in this workshop series:
- logging into a remote computer - in this case, an amazon instance
- downloading files directly to a remote computer
- installing software with conda
- cloning a git repository containing text files
- using a shell script to automate some tasks
- using snakemake to orchestrate a workflow
and it’s worth noting that essentially everything we did works equally well on a local Linux laptop, a remote HPC, and a remote cloud computer.
In this case, this is a private computer that only you have access to, so you don’t need to worry about file permissions or using a queue to run workflows.
11.6 Configuring your instance differently.
There are several optional set up configurations. Let’s explore them!
Go back to your instance page and let’s set up a new computer and explore some of the options that are available to you.
Click launch and then:
- Pick the AMI (OS) - Ubuntu Pro 20.04 LTS
- Pick an instance (T2 micro free tier!)
and now click Next: Configure Instance Details on the AWS page.
Configure the instance to suit your requirements. You can:
- change number of instances to launch
- select the subnet to use
- modify Stop or Terminate behaviors
- control if you would like the instance to update with any patches when in use
- request Spot Instances
A note on “Spot Instance”: A Spot Instance is an unused EC2 instance that is available for less than the On-Demand price. Because Spot Instances enable you to request unused EC2 instances at steep discounts, you can lower your Amazon EC2 costs significantly.
“Configure Storage”
- Your instance comes with a in built storage called instance store and is useful for temporary data storage. The default root volume on a
t2.microis 8 GB. - For data you might want to retain longer or use across multiple instances or encrypt it is best to use the Amazon Elastic Block Store volumes (Amazon EBS).
- Attaching EBS volumes to an instance are similar to using external hard drives connected to a computer.
- Click on Add New Volume for additional storage.
You can get up to 30 GB of EBS general purpose (SSD) or Magnetic storage when using Free tier instances.
“Add Tags”
- Tags are useful to categorize your AWS resources when you have many of them.
- A tag consists of a case-sensitive key-value pair. Some examples: GTEx-RNAseq, General-GWAS, KF-GWAS.
- Learn more about tagging your Amazon EC2 resources.
“Configure Security Group”
- Similar to setting up a firewall through which we would modify connection of external world and the EC2 instance.
- Blocks/allow connections based on port number and IP.
- You can create a new security group or select from an existing one.
- Learn more about Security groups for EC2 instances.
11.7 Shutting down instances
When you shut down your instance, any data that is on a non-persistent disk goes away permanently. But you also stop being charged for any compute and data, too!
Stopping vs hibernation vs termination
- Stopping:
- saves data to your disk (the EBS root volume )
- only EBS data storage charges apply
- No data transfer charges or instance usage charges
- RAM contents not stored
- Hibernation:
- charged for storage of any EBS volumes
- stores the RAM contents
- it’s like closing the lid of your laptop
- Termination:
- complete shutdown
- separate disks are detached
- data stored in EBS root volume is lost forever
- instance cannot be re-launched
To enable Hibernation, click the box in the Configure Instance step of the setup.

11.8 Exercise
Launch a t2.nano, Ubuntu 20.04 LTS - Focal instance in the the East US (Ohio) region. Change the root storage volume to 16 GiB and add an additional EBS volume (8 GiB).
Bonus points: Your added volume will persist after you have terminated your instance. Where can you find it?
Hints:
- Go to Amazon Market place and search for the “Ubuntu 20.04 LTS - Focal”. Should be the first result.
- Look in tab 4 called “Add Storage” to add additional storage volumes.
11.9 Checklist of things you learned today!
- A little bit about AWS and cloud computing
- How to launch an instance
- How to connect to the instance
- How to install and run a software program on the instance
- How to terminate your instance
Reminder: Terminate all your instances!
11.9.1 Additional Resources
11.10 FAQs
11.10.1 What are my data transfer costs?
AWS and other cloud provides typically charge for data transfer from their network to the external Internet (e.g. your home computer).
Costs are highly dependent on the region. For example, for S3 buckets located in the US West (Oregon) region, the first GB/month is free and the next 9.999 TB/month cost $0.09 per GB. However, if the S3 buckets are located in the South America (São Paolo) region, the first GB/month is still free, but the next 9.999 TB/month cost $0.25 per GB.
More info here: https://www.apptio.com/blog/aws-data-transfer-costs/
11.10.2 What are data storage costs?
11.10.3 What are the advantages of using AWS over an academic HPC?
(See Executing large analyses on HPC clusters with slurm from Workshop 10 for working with HPCs)
- Some universities don’t have a HPC
- No queues! No waiting!
- Can set up as many instances as you want (as long as you are willing to pay for them)
- Can install anything without needing admin permissions
- Almost no scheduled or unscheduled outages
- Easier to set up
- Easier to learn and get help on the internet
- Costs more over time, but someone is paying for the HPC too!
But if you have a good HPC, it is often cheaper.
11.10.4 Can you set up multiple instances at once
- Yes!
- There is a limit per account but it is a very large number and won’t apply to most people. (The limit is there to keep you from spending a lot of money by accident.)
11.10.5 Can you launch more than one instance with the same configurations?
- Yes, there is an option to do this on the instance set up page.
- Look in the second tab!
11.11 Concluding thoughts on the cloud
If your laptop can run your analysis, there’s no need to use the cloud.
Binder is a free, configurable option that runs in the cloud (remember binder, from Introduction to the UNIX Command Line? :)
Sometimes labs have workstations, and you can use those, too!
If you have an HPC account, you can try using that.
Cloud computing is most useful when you don’t have an investment in an existing computer, and you have a sudden need to do a bunch of compute. It can also be a way to briefly expand your compute options. Last but by no means least, cloud computers often have fast and cheap access to VERY large data sets; this is one reason why the NIH is so interested in data reuse via cloud computing.
AWS and GCP are commercial cloud options. If you prefer to write mini grant applications, NSF XSEDE will give you AWS-like computers via Jetstream, and HPC-like computers via PSC Blacklight and others. (Ask us for more information on these!)
The key thing is that everything we showed you works almost equally well independent of where you’re computing. The only differences are when you start needing to cooperate with others, via e.g. Slurm queueing.