6 Structuring your projects for current and future you
In this two hour workshop, we will discuss folder structures for organizing your projects so that you can track inputs, outputs, and processing scripts over time, and keep yourself organized as your projects evolve.
This lesson was adopted from a lesson co-authored by Shannon Joslin for GGG 298 at UC Davis.
6.1 Learning Objectives
By the end of this lesson, students will:
- know how to transfer files around efficiently
- understand how to set up a data-driven project for tracking and proper iteration
- know how to store and work with mass quantities of data
- understand why to setup projects in a specific manner
- begin to plan file and directory names for their own workflows
6.1.1 Lesson requirements
This lesson builds on workshop 3 and workshop 4.
Before continuing, please:
- be sure that you can log into farm.cse.ucdavis.edu with your datalab-XX account
- do pre-load some files into your account
6.2 Transferring files around efficiently
We’ve spent some time transferring single files around with ‘scp’, and hopefully you feel comfortable with that now. But many people (myself included) find ‘scp’ kind of annoying because you have to already know the path to the filename, and it’s kind of inconvenient for transferring multiple files around.
For this, we’re going to make the MobaXterm folk use a shell window:
OK, so what options are there when using ‘scp’?
6.2.1 recursive scp with -r
First, you can copy entire directories with scp by using -r –
from your laptop, try doing
scp -r datalab-XX@farm.cse.ucdavis.edu:2021-remote-computing-binder/2cities 2citiesthis will transfer the entire directory to your local computer.
6.2.2 sftp
You can use a command line within a command line with sftp.
Briefly,
sftp datalab-XX@farm.cse.ucdavis.eduwill open up a “secure file transfer” shell, that has its own set of commands. Try typing:
cd 2021-remote-computing-binder
cd 2cities
ls
get README.md
– I use this quite a bit when I want to be able to use ‘cd’ and ‘ls’ to find the right file to download.
Use quit to exit out of SFTP.
6.2.3 zip -r to create collections of files
Zip files work on pretty much all systems, and are handy ways to transport collections of files.
To create a zip file:
cd ~/2021-remote-computing-binder
zip -r 2cities.zip 2cities
The file ~/2021-remote-computing-binder/2cities.zip is now a file
you could copy or transfer around, and it will unpack to the entire
contents of the directory 2cities/.
To view the contents of a zip file:
unzip -v 2cities.zipand to unpack it:
cd ~/
unzip 2021-remote-computing-binder/2cities.zip
which will create a new directory ~/2cities/.
6.2.4 Working with .tar.gz files
While I strongly recommend using zip files, you will inevitably run into .tar.gz files on UNIX. You can think of these as “collections of files that have been glommed into one file and then gzipped”, and here are the two commands you need to know:
tar tzvf ~ctbrown/2cities.tar.gzwill show you the contents of a .tar.gz file, and
tar xzvf ~ctbrown/2cities.tar.gzwill unpack it into your current directory.
I don’t recommend creating .tar.gz files in general so I’m not going to show you how to create them :).
tar stands for ‘tape archive’ and is notoriously confusing to use, so I’m not going to say any more about it.
6.2.5 Probably the most useful advice: use a transfer directory
To me, it’s really annoying to find and remember directory paths and filenames when transferring files around, and I’ve been doing it for 30 years and am really practiced at it.
So what I sometimes do is use a ‘transfer’ directory.
On farm,
mkdir ~/transfer
cp ~/2021-remote-computing/2cities/README.md ~/transfer/
and now (on your laptop) you can just do things like
scp datalab-XX@farm.cse.ucdavis.edu:transfer/README.md .and you don’t have to remember the full path.
This is handy because you can use your current working directory and things like tab completion on the remote system to copy files into your transfer directory, and then remember only a short path to actually transferring files around.
I use this when I’m working in complicated or annoying directory structures.
6.3 Retrieving remote files from Web sites
Often you want to grab files from Web sites - CSV data sets, text files, or what have you.
This involves finding the URL, and then using a program like wget or
curl to get them. We’re going to use curl today, but wget does pretty
much the same thing.
Let’s find a URL for the Tale of Two Cities book that we’ve been using, over on Project Gutenberg.
Go to this Web site in a browser: https://www.gutenberg.org/ebooks/98
and find the link that says “Plain text”. Right click on it, and “copy link”.
Now go back to your terminal window where you’re logged into farm, and run
cd ~/
curl -L -O https://www.gutenberg.org/files/98/98-0.txt
and this will create a file 98-0.txt in your current directory.
You can run head on this file:
head 98-0.txtand see that it contains the right text.
The trick is often to find the right URL to get the raw text link. For example, if you go to a GitHub link, like
https://github.com/ngs-docs/2021-remote-computing-binder/blob/latest/2cities/README.md
and you run curl on this you will get the formatted Web file, which isn’t generally what you want.
What you want for GitHub files is the ‘Raw’ link - try clicking on that. This is now the text file, and you can use curl on it –
curl -L -O https://github.com/ngs-docs/2021-remote-computing-binder/blob/latest/2cities/README.mdNote here that the -L tells curl to follow Web redirects, which can be important; and -O says save the file under the name at the end of the URL. You can omit -O and it will send the file to stdout:
curl -L https://github.com/ngs-docs/2021-remote-computing-binder/blob/latest/2cities/README.md > new-file.txt
cat new-file.txt
The really nice thing about this is that for big files, the file will transfer directly between the hosting site and the remote computer. This is really handy for e.g. large sequencing data files that are located at sequencing facility Websites - you don’t have to download 100 GB files to your laptop and then transfer them from there to farm, or into the cloud, for example! (This is a big reason why cloud computing is really interesting for the NIH - less data transfer between distant computers for really big data sets!)
Other than finding and copying the right URL, the other tricky thing that doesn’t generalize is permission-restricted files. Briefly, since you’re copying the URL from your browser (where you may be logged in) over to farm (where you may not be logged in), farm may not have access to download it. There is no one-size-fits-all solution to this, unfortunately.
And, again, we’ll be covering retrieving files from github in other ways during workshop 8.
CHALLENGE:
- Pick any book from https://www.gutenberg.org/
- Find the URL for the plain text
- Copy the URL
- Use
curlto download it to farm - Look at it with
head
6.4 Dealing with files: some recommendations
Some short-hand rules I recommend for working with files on remote systems.
- download big files directly to remote computer system if possible, so that they don’t go via your home/work Internet connection or laptop (which is often more limited than the remote computer’s connection!);
- get used to transferring files to/from your laptop (see below); consider using a
transfer/directory for simplicity; - for managing small files that you create on a remote system, use version control (workshop 8)
- you can also configure Dropbox on Linux systems, but it burdens the system and it’s also not a great idea to copy files that are probably private over to a shared system. I’ve also had some bad experiences with deleting my entire Dropbox by mistake… UNIX makes it a little too easy to operate on lots of files!
6.5 Farm vs cloud
One of the main differences that you’ll see over time is that there are “remote, shared” systems like farm, and “remove, private” systems like binder and Amazon/Google cloud computers. The cloud computers often guarantee you resources and some level of privacy along with superuser privileges, but also charge you for it (and it’s often inefficient use of compute!) By contrast, “remote, shared” systems like HPCs and shared workstations can provide larger resources at the cost of sometimes having to worry about what other users are doing.
The “ride share” vs “personal car” analogy is fairly apt here, actually :). In shared cars, you have to worry about where other people want to go and accomodate them at least sometimes, but you can share purchase and maintenance costs. With personal cars, you bear the entire cost burden, but you don’t have to coordinate with other people much.
There are no simple answers as to what system to use, but I feel confident in asserting that if you have access to a shared compute cluster, you should start there and only consider expanding into the cloud once you know your needs.
6.6 Thinking about data science projects!
The next sections all talk about configuring your data and directories so that you can track your work.
This is because, fundamentally, we use computers to first explore data sets, before refining and producing.
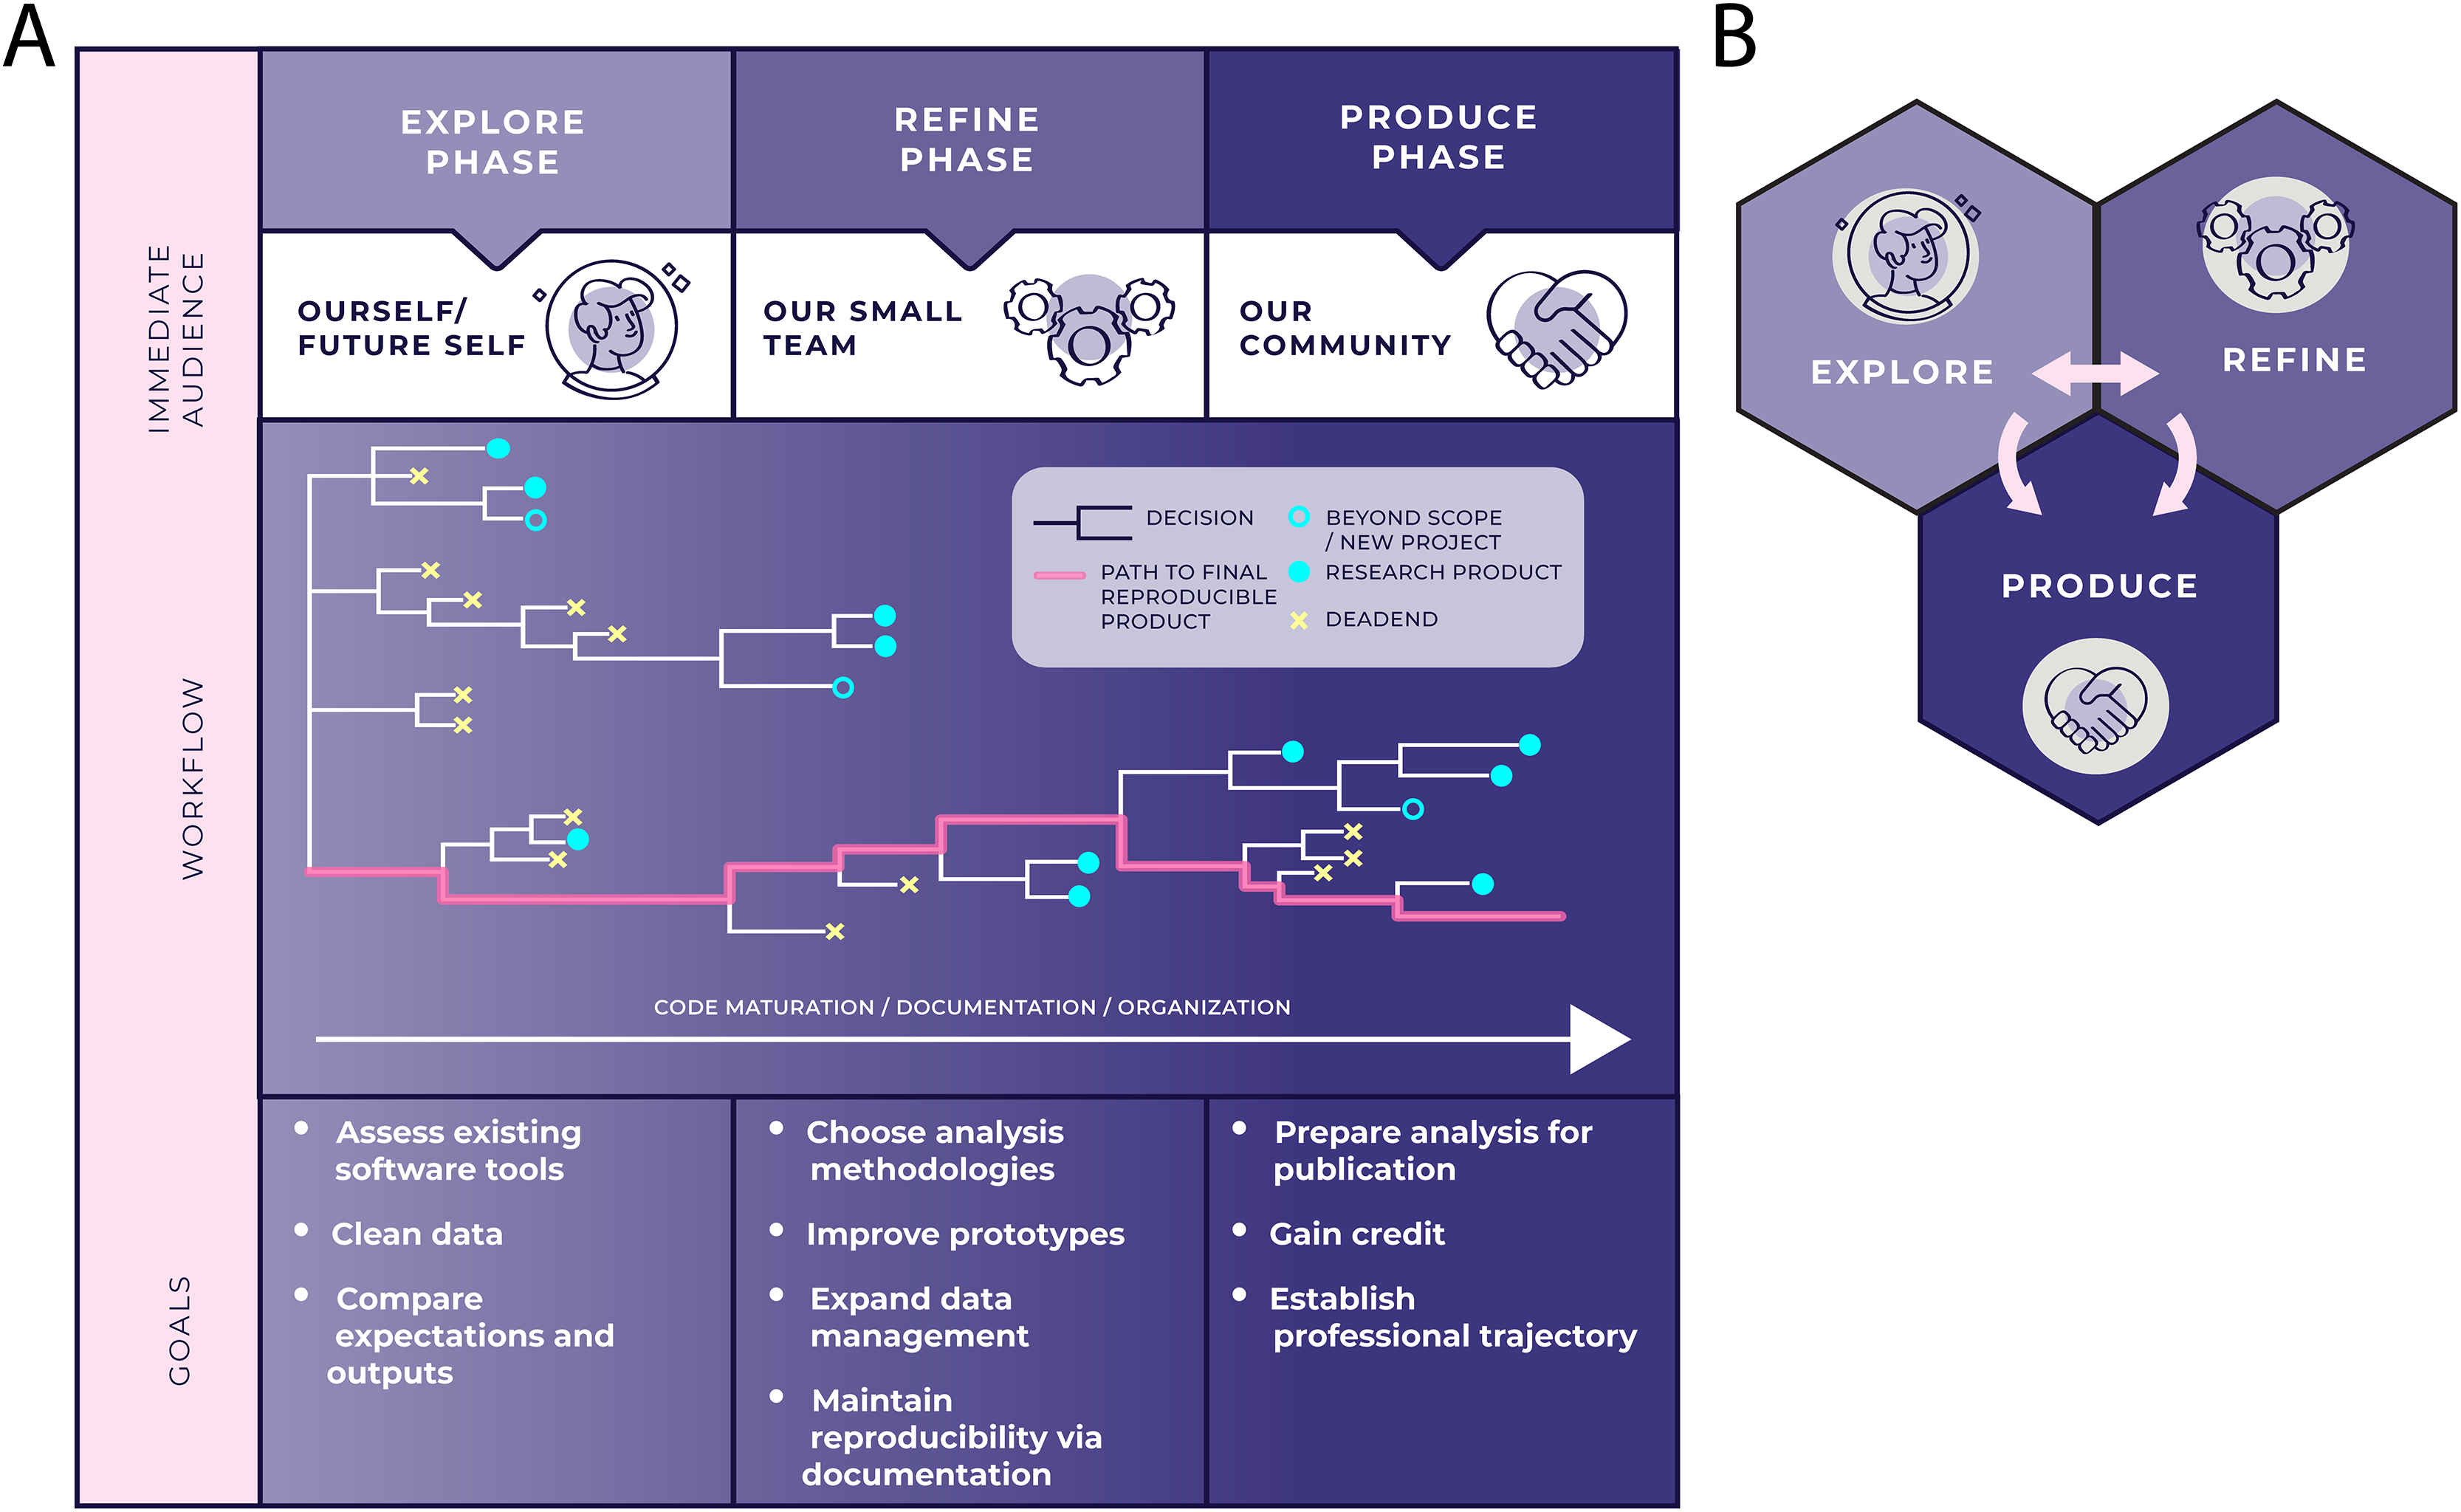
Figure 1 from Stoudt et al., 2021
So we need to organize our projects for iteration, dead-ends, and tracking processes over time - potentially months, or years. And that’s what the next few sections will be about.
For more discussion and details, I highly recommend Principles for data analysis workflows, Stoudt et al., 2021, which is the best exploration of real data science practice I’ve yet seen. (Conflict alert: I was a reviewer :)
6.7 One example: a rough bioinformatics workflow
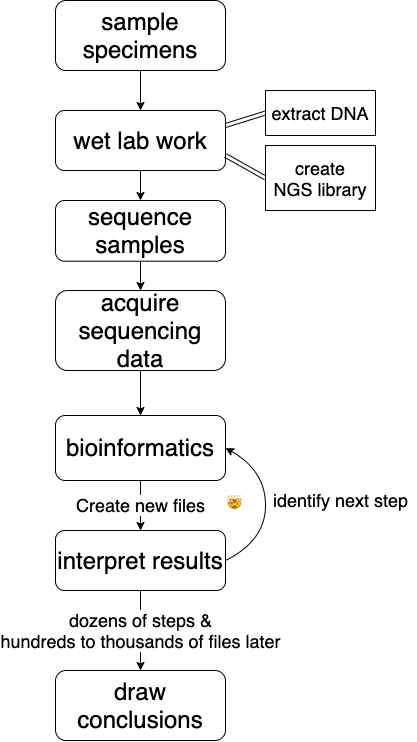
a bioinformatics workflow
6.8 Sending and Receiving Data
Here at UC Davis most researchers sequence at the UC Davis DNA Technologies Core. You can find their sample submission form here.
When they’ve sequenced your samples they will hold your sequencing data on either SLIMS lab information management system for three months after the sequencing run finishes or bioshare for an undetermined amount of time. Do yourself a favor and download & back your new sequencing data up to a hard disk IMMEDIATELY.
6.8.1 Downloading data - is it correct?
We’ll be grabbing some from OSF, an open science framework that can host small amounts of data (5Gb limit).
Let’s setup a directory to work from and download some data:
mkdir -p ~/seqdata
cd ~/seqdata
curl -L https://osf.io/srdhb/download -o mini_Alca-torda.tar.gz
tar -xvf mini_Alca-torda.tar.gz
cd mini_A-torda
ls -alh
And we should see a list of Alca torda chromosomes.
We got some data! However, the data could have been changed or corrupted in the process of downloading it from the Internet. (This CAN happen, and WILL happen if you do this for long enough!)
We can address this problem by using the md5sum command. md5sum, in short, is a command that spits out a string of characters to represent a file’s fingerprint. If a file with the same name has characters that are different the md5sum will show the difference, so we don’t have to find the difference. This is exceptionally valuable when we have files that contain gigabytes of data.
Let’s see what an md5sum looks like:
md5sum mini-chr1.fna.gzyou should see something exactly like:
d34e2c570ef79195dfb56b8c258490f8 mini-chr1.fna.gz
Here you can see a string of characters that represent the mini-chr1.fna.gz md5sum. The first string of characters is the file’s “fingerprint”. The second is the name of the file–this is useful when we md5sum multiple files.
If you change even a single byte of the file, the md5sum fingerprint will change completely.
So, We can check to make sure the data downloaded successfully by seeing if the string of characters generated by md5sum matches the ones in the @mini_A-torda.md5 file.
First, take a look at the file:
less \@mini_A-torda.md5(press Q to exit)
We can check a list of md5sums contained in a file with the -c flag. The command will automatically look for files contained in the list and check the md5sum against the ones printed in the file.
md5sum -c \@mini_A-torda.md5But if we navigate into the data/ directory we can see there is a mini-chr1.fna.gz file there too. Are they the same?
CHALLENGE: Determine if the two mini-chr1.fna.gz files are the same.
Anytime you download large data files you should check to make sure it has downloaded successfully. In bioinformatics, this includes raw sequence data from a sequencing center, data from collaborators host on a shared space, sequence files from NCBI, transferring data between devices, downloading data from clusters and so on and so forth. (Most sequencing centers will automatically provide md5sums with your data. If they do not, email to request them!)
This holds true for other files as well - always be alert to the possibility of data corruption! Sometimes this can be as innocuous as “all the line endings in my CSV file are changed because someone opened and saved it in a different text editor”; sometimes it can be much worse, as when Excel started automagically changing gene names like “Oct-8” into dates…
We can also make a list of md5sums for a group of files:
cd ~/seqdata/mini_A-torda
md5sum mini-chr[1-9]*.fna.gz  >> autosomes.md5
Here, we’ve redirected the output of the md5sum command to the autosomes.md5 file. We can then host/send our data with the md5 file for others to ensure the recipients know they’ve received the same data.
6.9 Storing data
In any data analysis, we’re going to end up producing a lot of intermediate files. Which ones do we need to save? And how big are they?
The answers will vary depending on workflows. For bioinformatics (and potentially a range of other data types - your mileage may vary!) we suggest the following:
6.9.1 Bioinformatics: What do I back up?
- raw data – YES – you only get them once!
- results files – YES – they are so useful
- intermediate files – maybe – they can be used in many different ways
That having been said, a lot of what we’ll show you over the next few workshops is how to regenerate your intermediate files when you need them, and/or keep them up to date.
6.9.2 Bioinformatics: How big should I expect the files to be?
- Raw data will probably be the biggest
- Results files depends on what you are doing
- Metadata are usually pretty small
- Intermediate files are usually smaller than your raw data files but there will be a lot of them
Always, always back up raw data. Once the sequencing center deletes the data, it is gone forever!
As such, make sure you’ve have your data backed up. As soon as you download onto the cluster back it up to another device (or two!).
After you’ve finished your project you’ll probably have some pretty valuable results files. Back these up! It is likely that these files won’t be nearly as large as our original files and they can often be put on osf.io or downloaded to a laptop.
Examples:
| file type | size | # of files | Total Space |
|---|---|---|---|
| Raw Genome Assembly sequencing files | 44Gb | 2 | 88Gb |
| Intermediate files | 12Gb | 2 | 24Gb |
| Assembled Genome | ~550Mb | 1 | 55Mb |
| Raw RAD seq data | 92Gb | 2 | 184Gb |
| Intermediate files from RADseq | ~25Mb | 20,925 | 741Gb |
| Results of PopGen expt | 9.3Mb | 2 | ~20Mb |
Data files will come in a variety of sizes. In general, the largest single files will be the raw data files you receive from the sequencing center. Individual files in each subsequent step will be smaller (but there might be more of them!) because each step throws out or compresses data.
However, new files are generated at most steps in most projects. Because of this, the sheer number of intermediate files can take up a lot of space!
6.9.3 How often should I backup my data?
Scripts and code: This varies person to person. I suggest posting your scripts to GitHub and to push to GitHub at least everyday you modify your scripts. (This is what we’ll teach in workshop 8!) GitHub will give you free private repositories as an academic, so you don’t need to make things public.
Raw Data: Luckily, you’ll only need to backup your raw data once. Or maybe twice. Just don’t delete it!
Results: Again, these only need to be backed up once. However, if you reanalyze your data make sure you save the new results. Or at least the workflow you used to get there.
6.9.4 Where do I back up my data?
There are a number of places you can backup to, for better or for worse.
Small amounts of data (< 100 MB) that you would like version controlled, such as code, can be backed up to GitHub. Note that GitHub is not archival and cannot be used as the permanent post-publication place for your scripts, but there are solutions for that (search “github zenodo”).
Small amounts of data (100 Mb - 5Gb) can be stored on a project by project basis at the Open Science Framework. Each project is allocated 5Gb of space and there is no limit on number of projects. OSF also supports private and collaborative projects, and can be referred to in publications, so you can use it as your “raw results” location too.
Large amounts of data (> 5Gb) The most reasonable solution to this is to back data up to a (or multiple) hard drives! Data can be stored via your Google Drive account. To store data using storage space that UC Davis has allocated to you, see this Meet & Analyze Data tutorial.
6.10 Where do I work with large amounts of data?
6.10.1 High Performance Computing Clusters
aka clusters (or HPCs).
UC Davis has a number of clusters available to students, depending on your department or where your lab has purchased resources:
- farm
- crick
- barbera
Pros:
- maintained on campus
- help desk for troubleshooting
Cons:
- requires an initial buy in to get a significant amount of space & compute
6.10.2 Amazon Web Service
These are cloud computing services provided by Amazon (what don’t they provide!?) We’ll be showing you how to use Amazon for workshop 11.
Pros:
- Only pay for what you use
- Can have temporary access to supercomputers which could end up costing less than consistent access on a cluster
- great for short-term massive compute needs, if you have the $$
Cons:
- no long term storage…unless you want to pay for that too
- must build everything yourself
- no help desk
- have to pay for downloading (“egress charges”)
All platforms have pluses and minuses. The one that will work best for you depends on your lab. I prefer the farm, for ease of use & consistency, if your lab can support you.
6.11 Setting up your project
QUESTION Imagine you are at the end of a project, about to write up the manuscript. Looking back over carrying out your experiment(s), what were the top 3-5 most useful things to getting to the point of writing up? And how can you communicate those to future you (and others)?
6.11.1 Things to think about
- multiple projects
- inputs and outputs
- directory structure
- testing analyses
In bioinformatics, organization is everything. It allows us to be efficient in setting up experiments, maintain consistency between experiments and, in some cases, repeat a previous analysis.
Here we can see how organization allows for a tidy workspace:
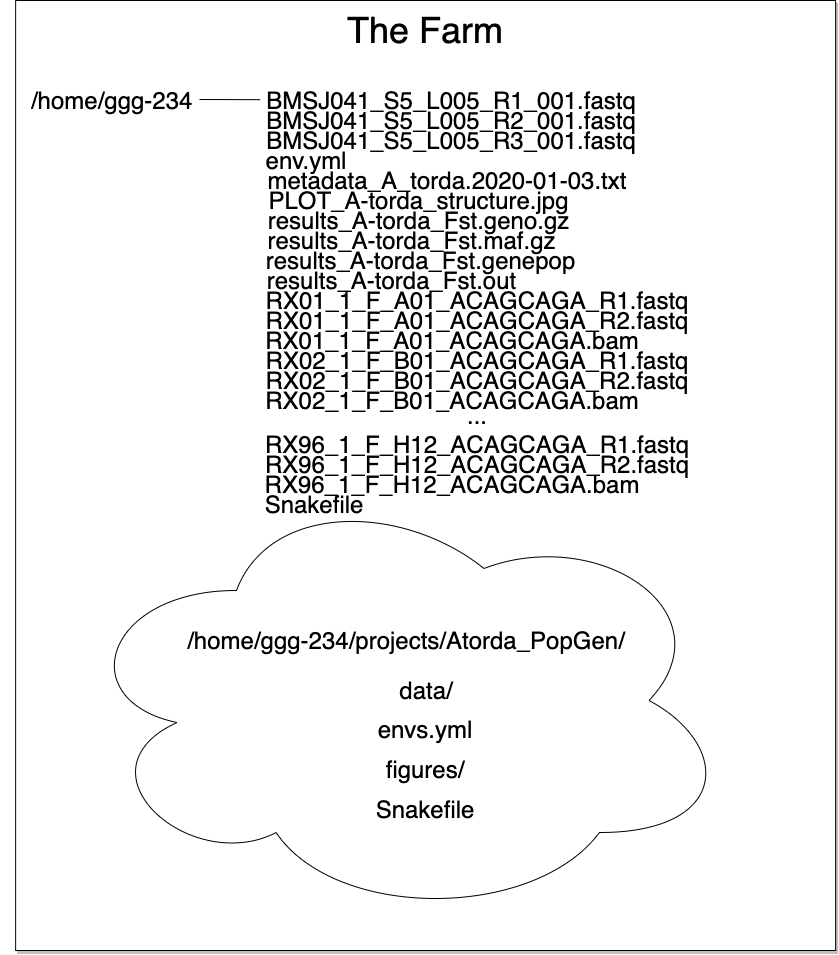
project paths
The list of files up top isn’t too cringe worthy if you only have one project. But multiple projects or experiments in one directory results in an organizational disaster…
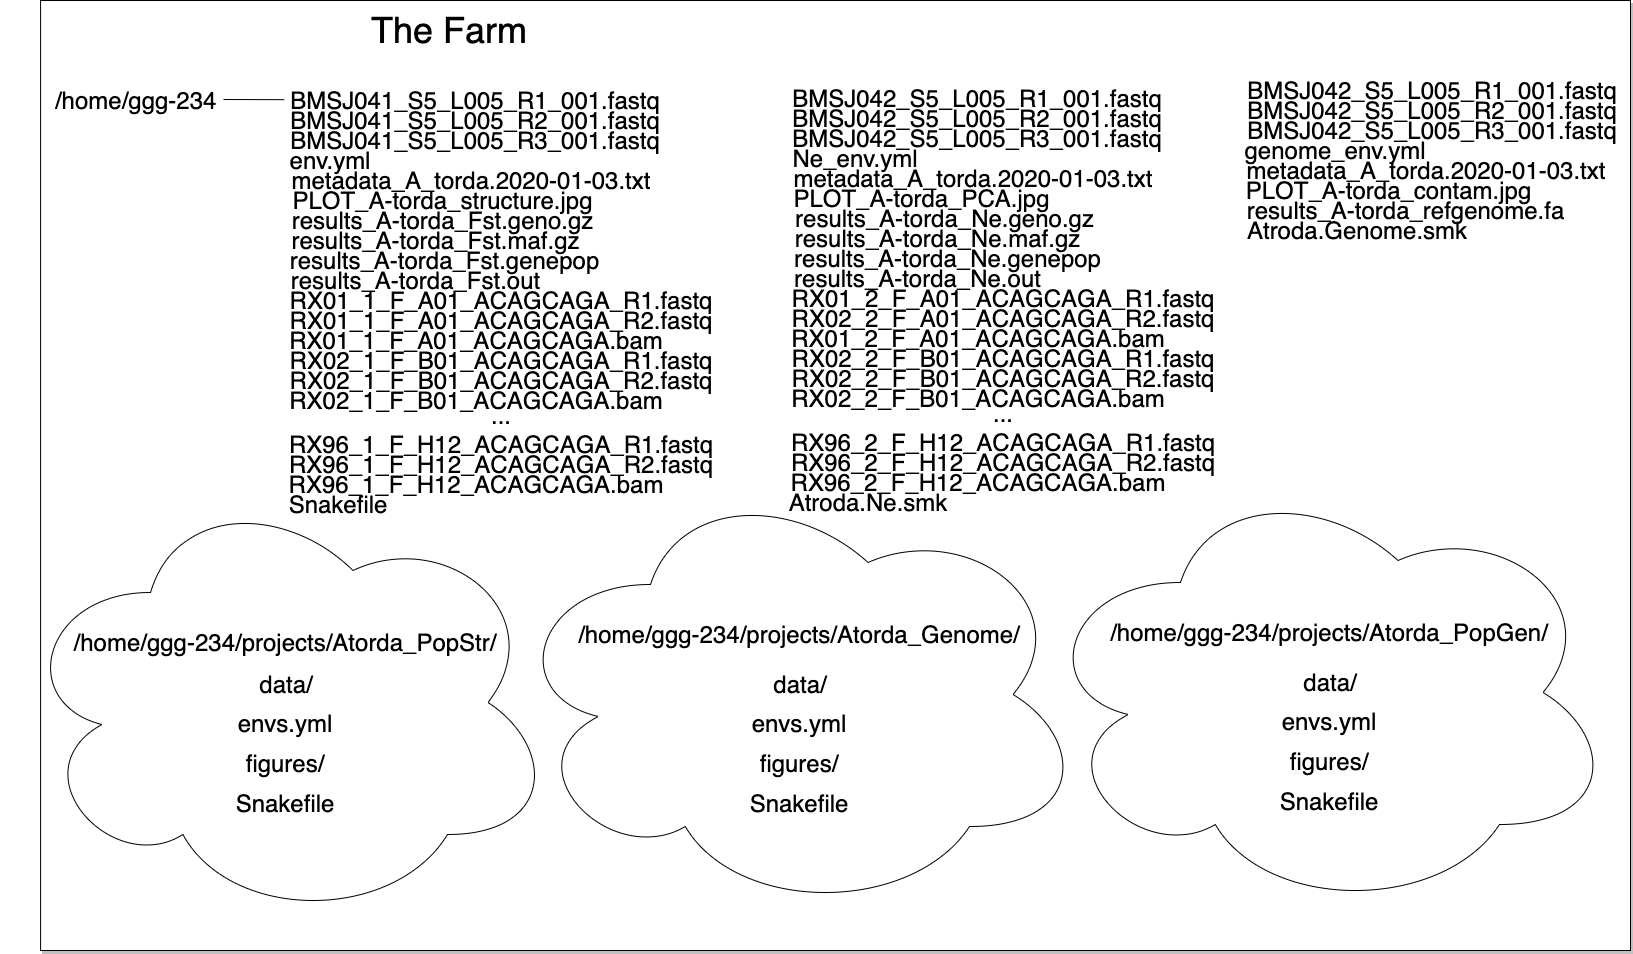
paths
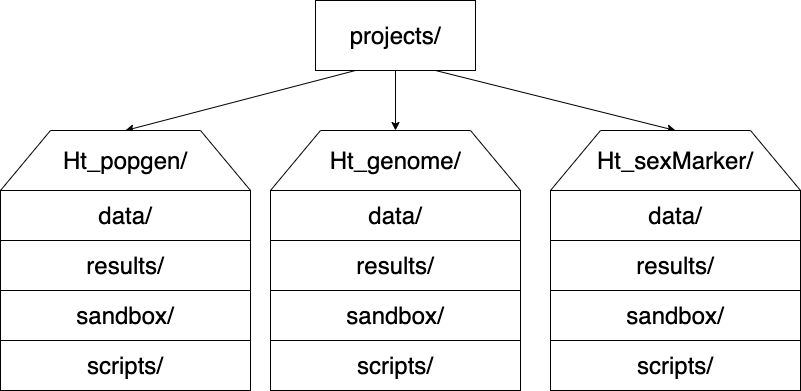
I like to have the following directory structure:
6.12 Naming files
Having files with consistent names allows us to do things to them en masse and can also allow us to know what has been done to them. Everyone has a different strategy in what they like their file names to contain and how they go about naming them but here a few suggestions.
6.12.0.1 Prefixes
Use the beginning of your file to your advantage. If you’ve sequenced individuals yourself, you can name these files according any or all of the following:
- which individual they are from
- what well in the plate they came from
- the barcode/tag/library they have/were a part of
- the date of sampling
- which cohort they are a member of
An example of this might be something like Ht_1997_A08_21_ACTGTT.fastq
where:
- Ht = species ID (Hypomesus transpacificus)
- 1997 = birth year
- A08 = well number
- 21 = plate number
- ACTGTT = associated barcode
Having some metadata in the file name can allow for efficient groupings when running quality controls (such as testing for batch effects).
If we keep our names consistent between plates/runs could run an analysis on all individuals that were from any of these variables.
And, as a reminder, with tab completion, long and ugly file names are not really a problem to type!
6.12.0.2 File endings
The ends of files can be immensely helpful as well. Remember, at the
command line, a file’s ending (e.g. .txt or .csv) exists to inform
a human what kind of file/format to expect. You’ll see some examples
of using this in automated scripts in workshop
7
and workshop
9.
6.13 Looking forward to the next few workshops: techniques for doing data science on remote computers.
The discussion below motivates the next few workshops :).
In workshop 7, we’ll talk about basic scripting and working with many files and how to conduct long-running analyses.
In workshop 8, we’ll show you git and how to track changes to text files.
In workshop 9, we’ll talk about using the snakemake workflow system to efficiently and effectively automate larger scale analyses.
In workshop 10, we’ll discuss how to execute jobs using the SLURM system to tap into farm’s compute cluster.
And, finally, in workshop 11 we will demonstrate the use of cloud compute resources as another source of remote computing.
6.14 Additional resources
- Bioinformatics Data Skills by Vince Buffalo
- Best Practices for Sci Comp (Wilson et al. 2014)
- Bioinformatics Curriculum Guidelines (Welch et al. 2014)